
Vulnerability Assessment
Hands-on playbook for VA — register an asset, run a scan, read findings, generate reports, and stay within plan quotas.
Vulnerability Assessment
This page walks you through using the XHack VA tool from a cold start to a production-ready report. Every step uses the actual UI labels and flows you'll see in the app.
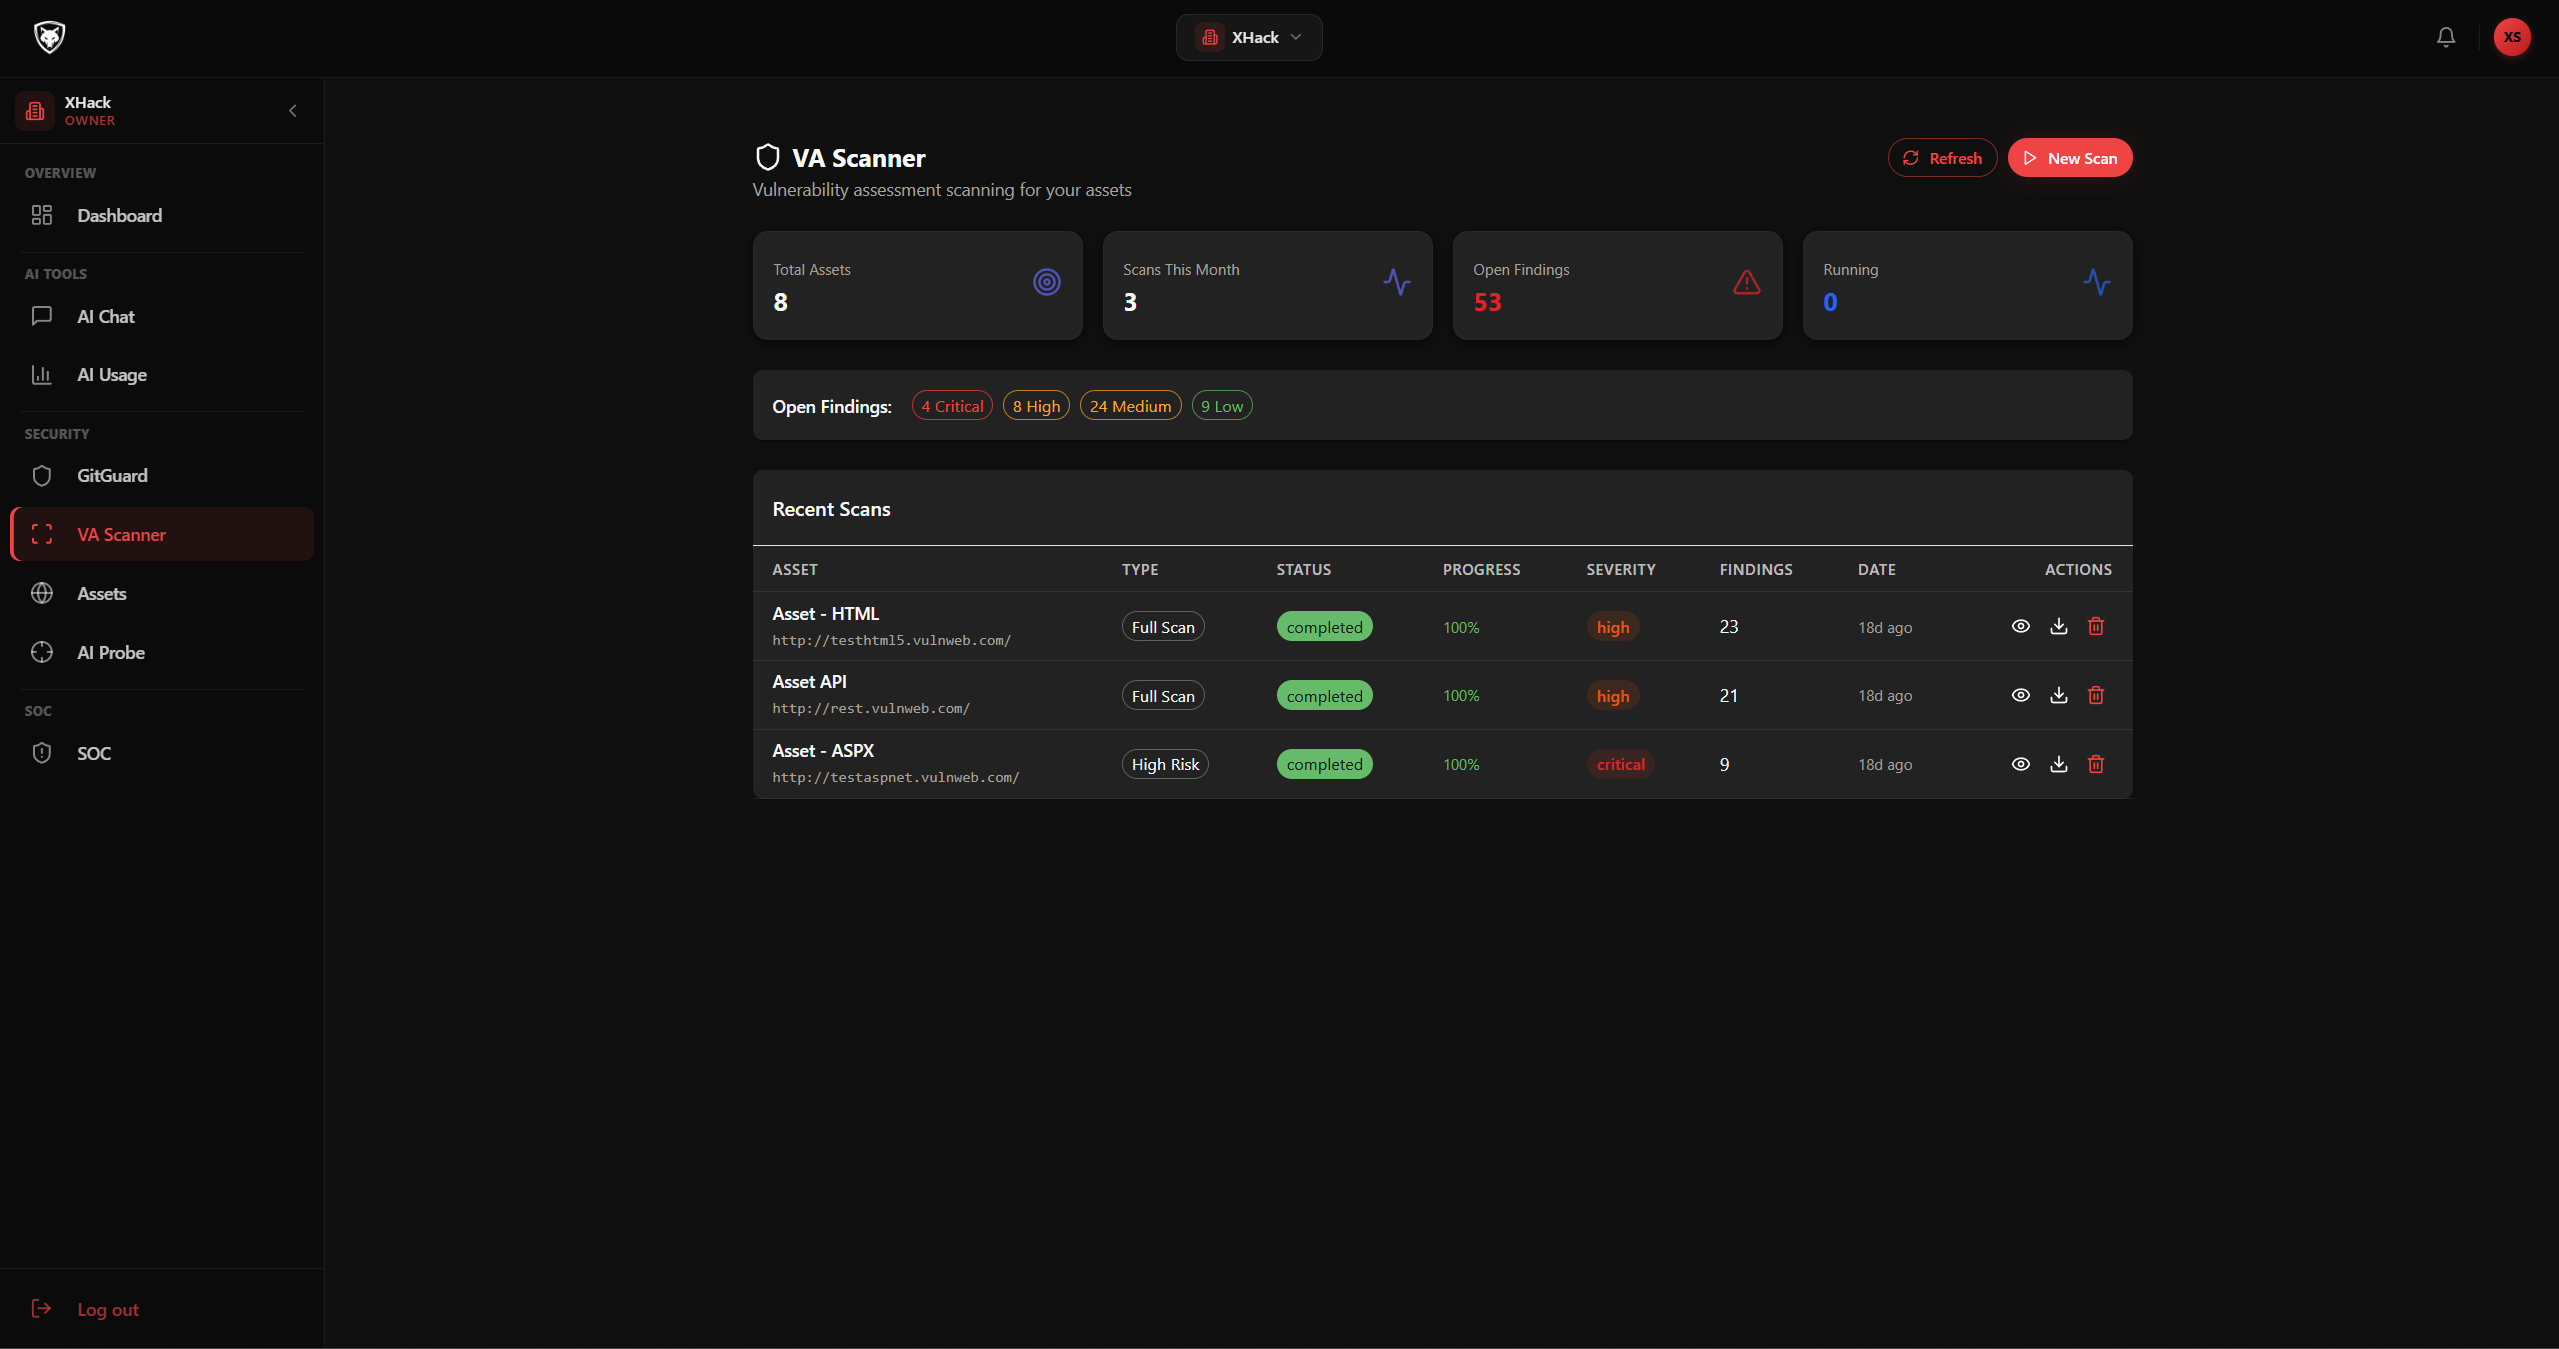
Before you start
VA scans run against assets you own. You need at least one verified asset. If you haven't registered one yet, follow Asset Management first — come back here when the asset shows the green Verified chip.
Step 1 — Pick a target and start a scan
Click VA in the main sidebar. The VA dashboard shows your scan history at the top and a target picker.
- Click Start scan (or New Scan if you already have history).
- Pick the verified asset you want to scan from the dropdown.
- The scan starts immediately and you're taken to the scan detail page.
- The scan now runs in the background. You can leave the page — when you come back the findings will be there.
You'll get a notification (in-app and via any webhooks subscribed to va_scan_complete) when the scan finishes.
Step 2 — Watch findings come in live
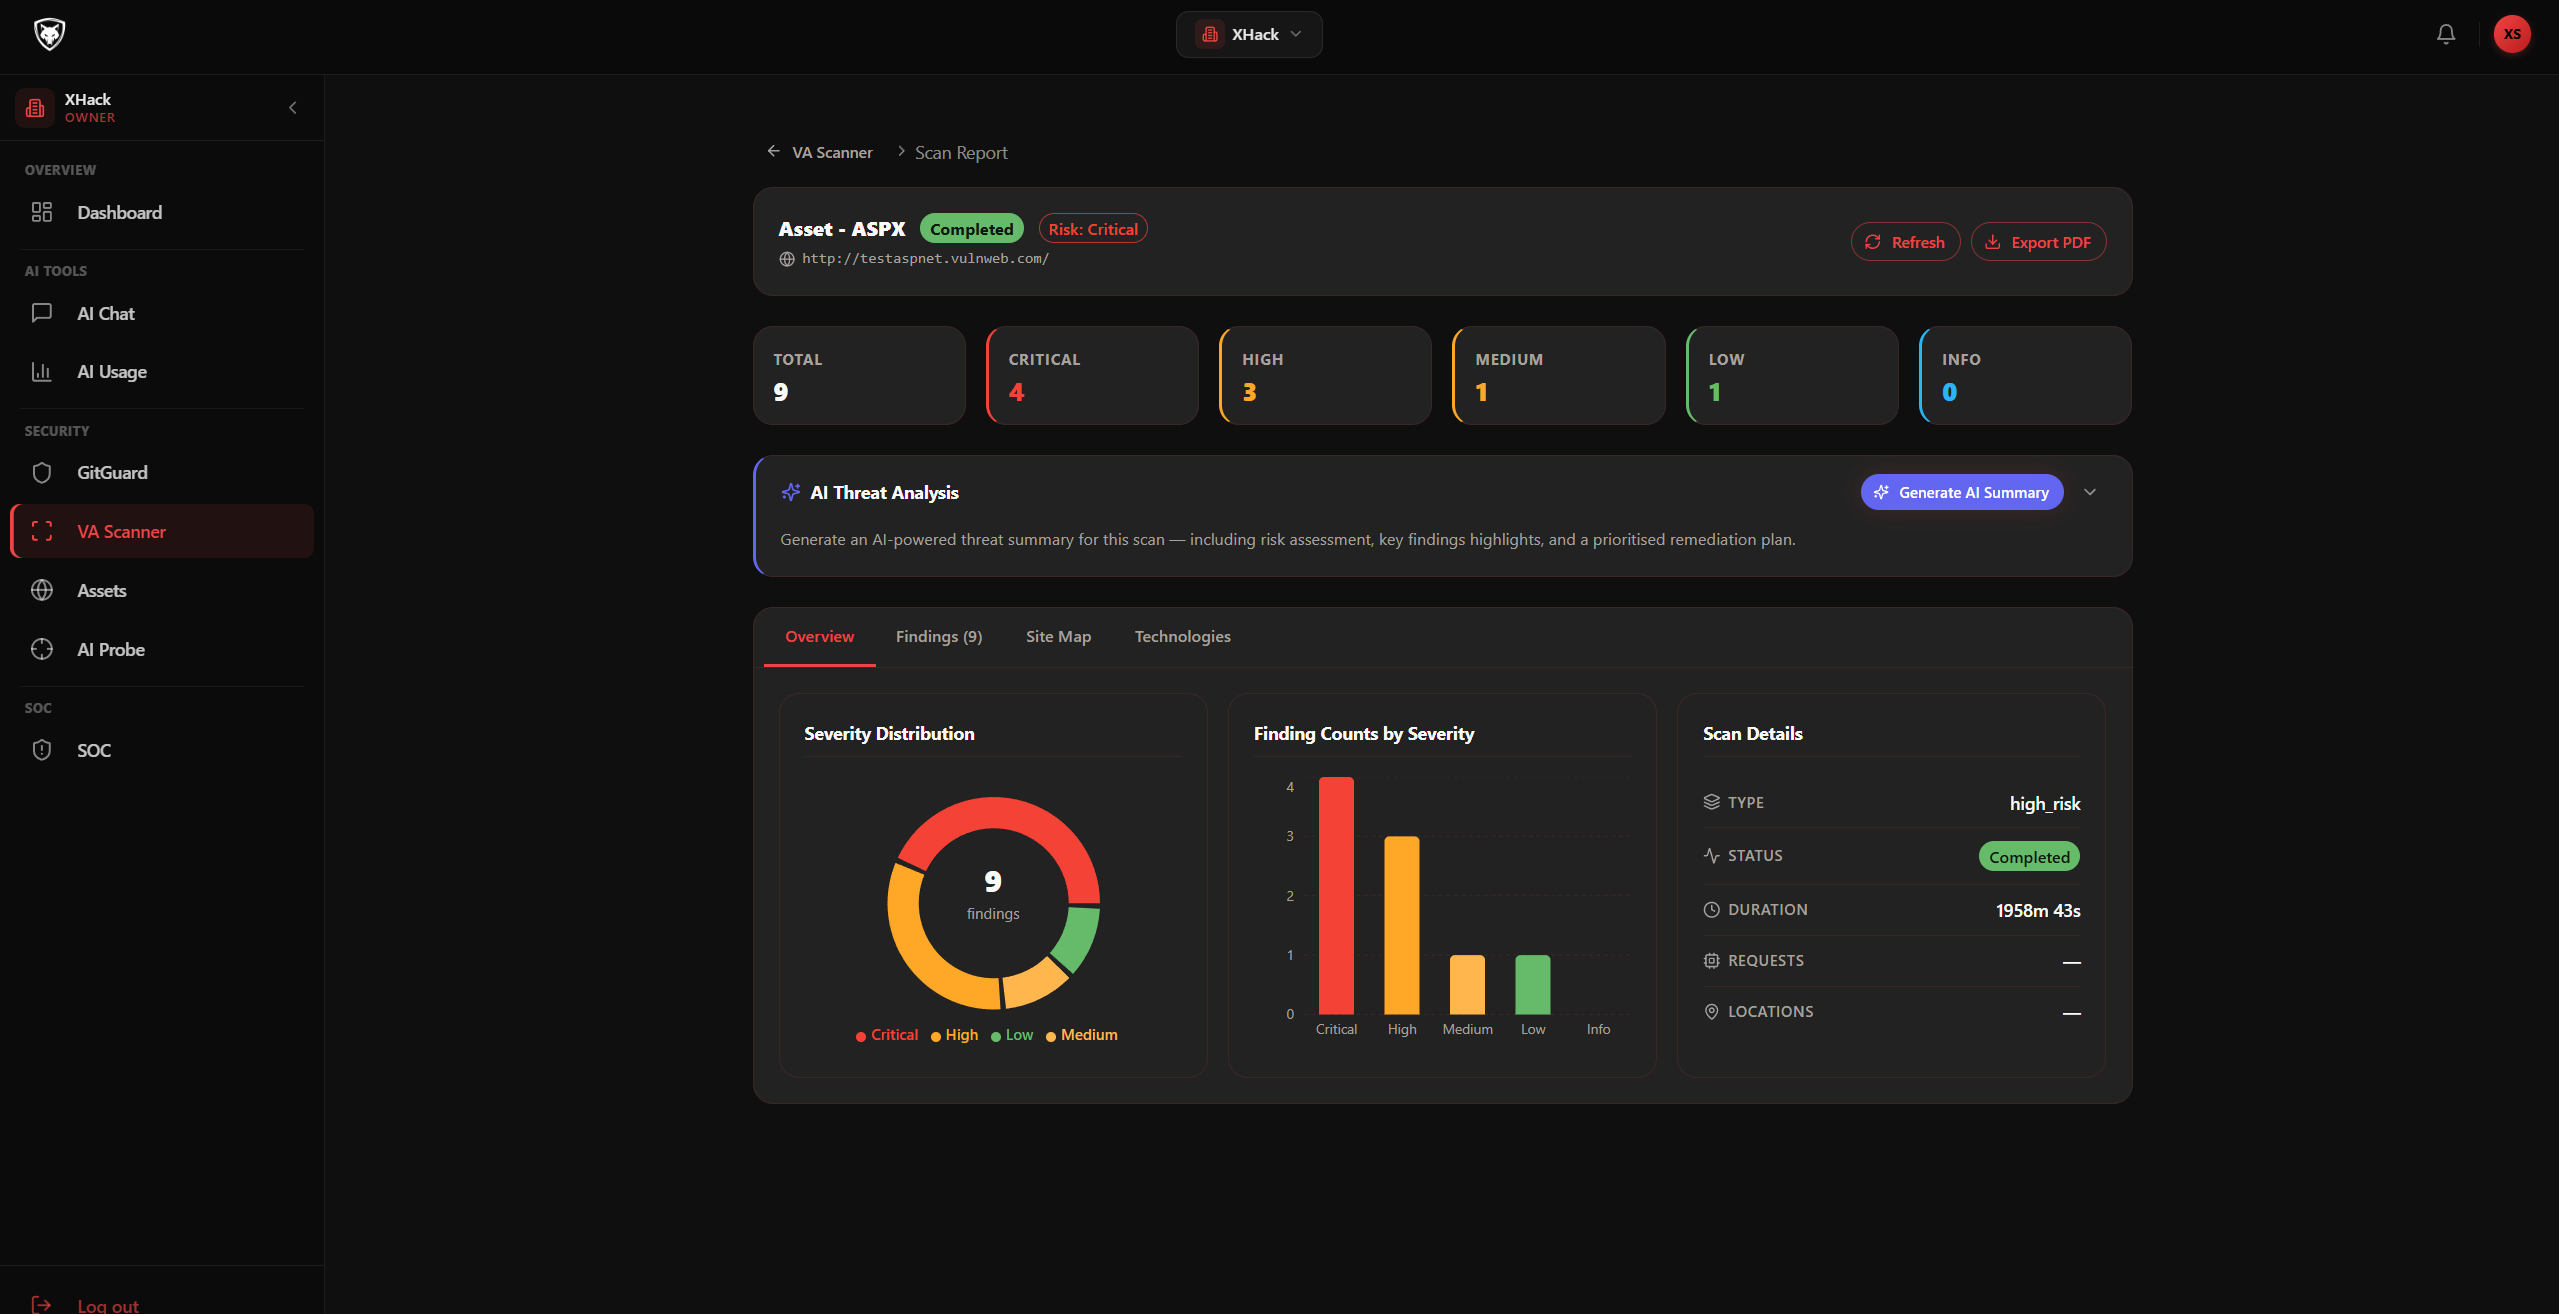
While the scan runs, the page streams findings as they're confirmed. The header shows progress percentage, current phase (reconnaissance → enumeration → discovery → confirmation), and elapsed time.
The scan detail page has tabs:
- Overview — high-level stats: severity counts, completion %
- Vulnerabilities — every confirmed finding so far
- Activity — phase-by-phase progress log
- Settings — scan configuration (read-only after start)
You don't have to wait for the scan to finish before drilling into a finding. Click any row in the Vulnerabilities tab as soon as it shows up.
Step 3 — Read a finding
Open the Vulnerabilities tab.
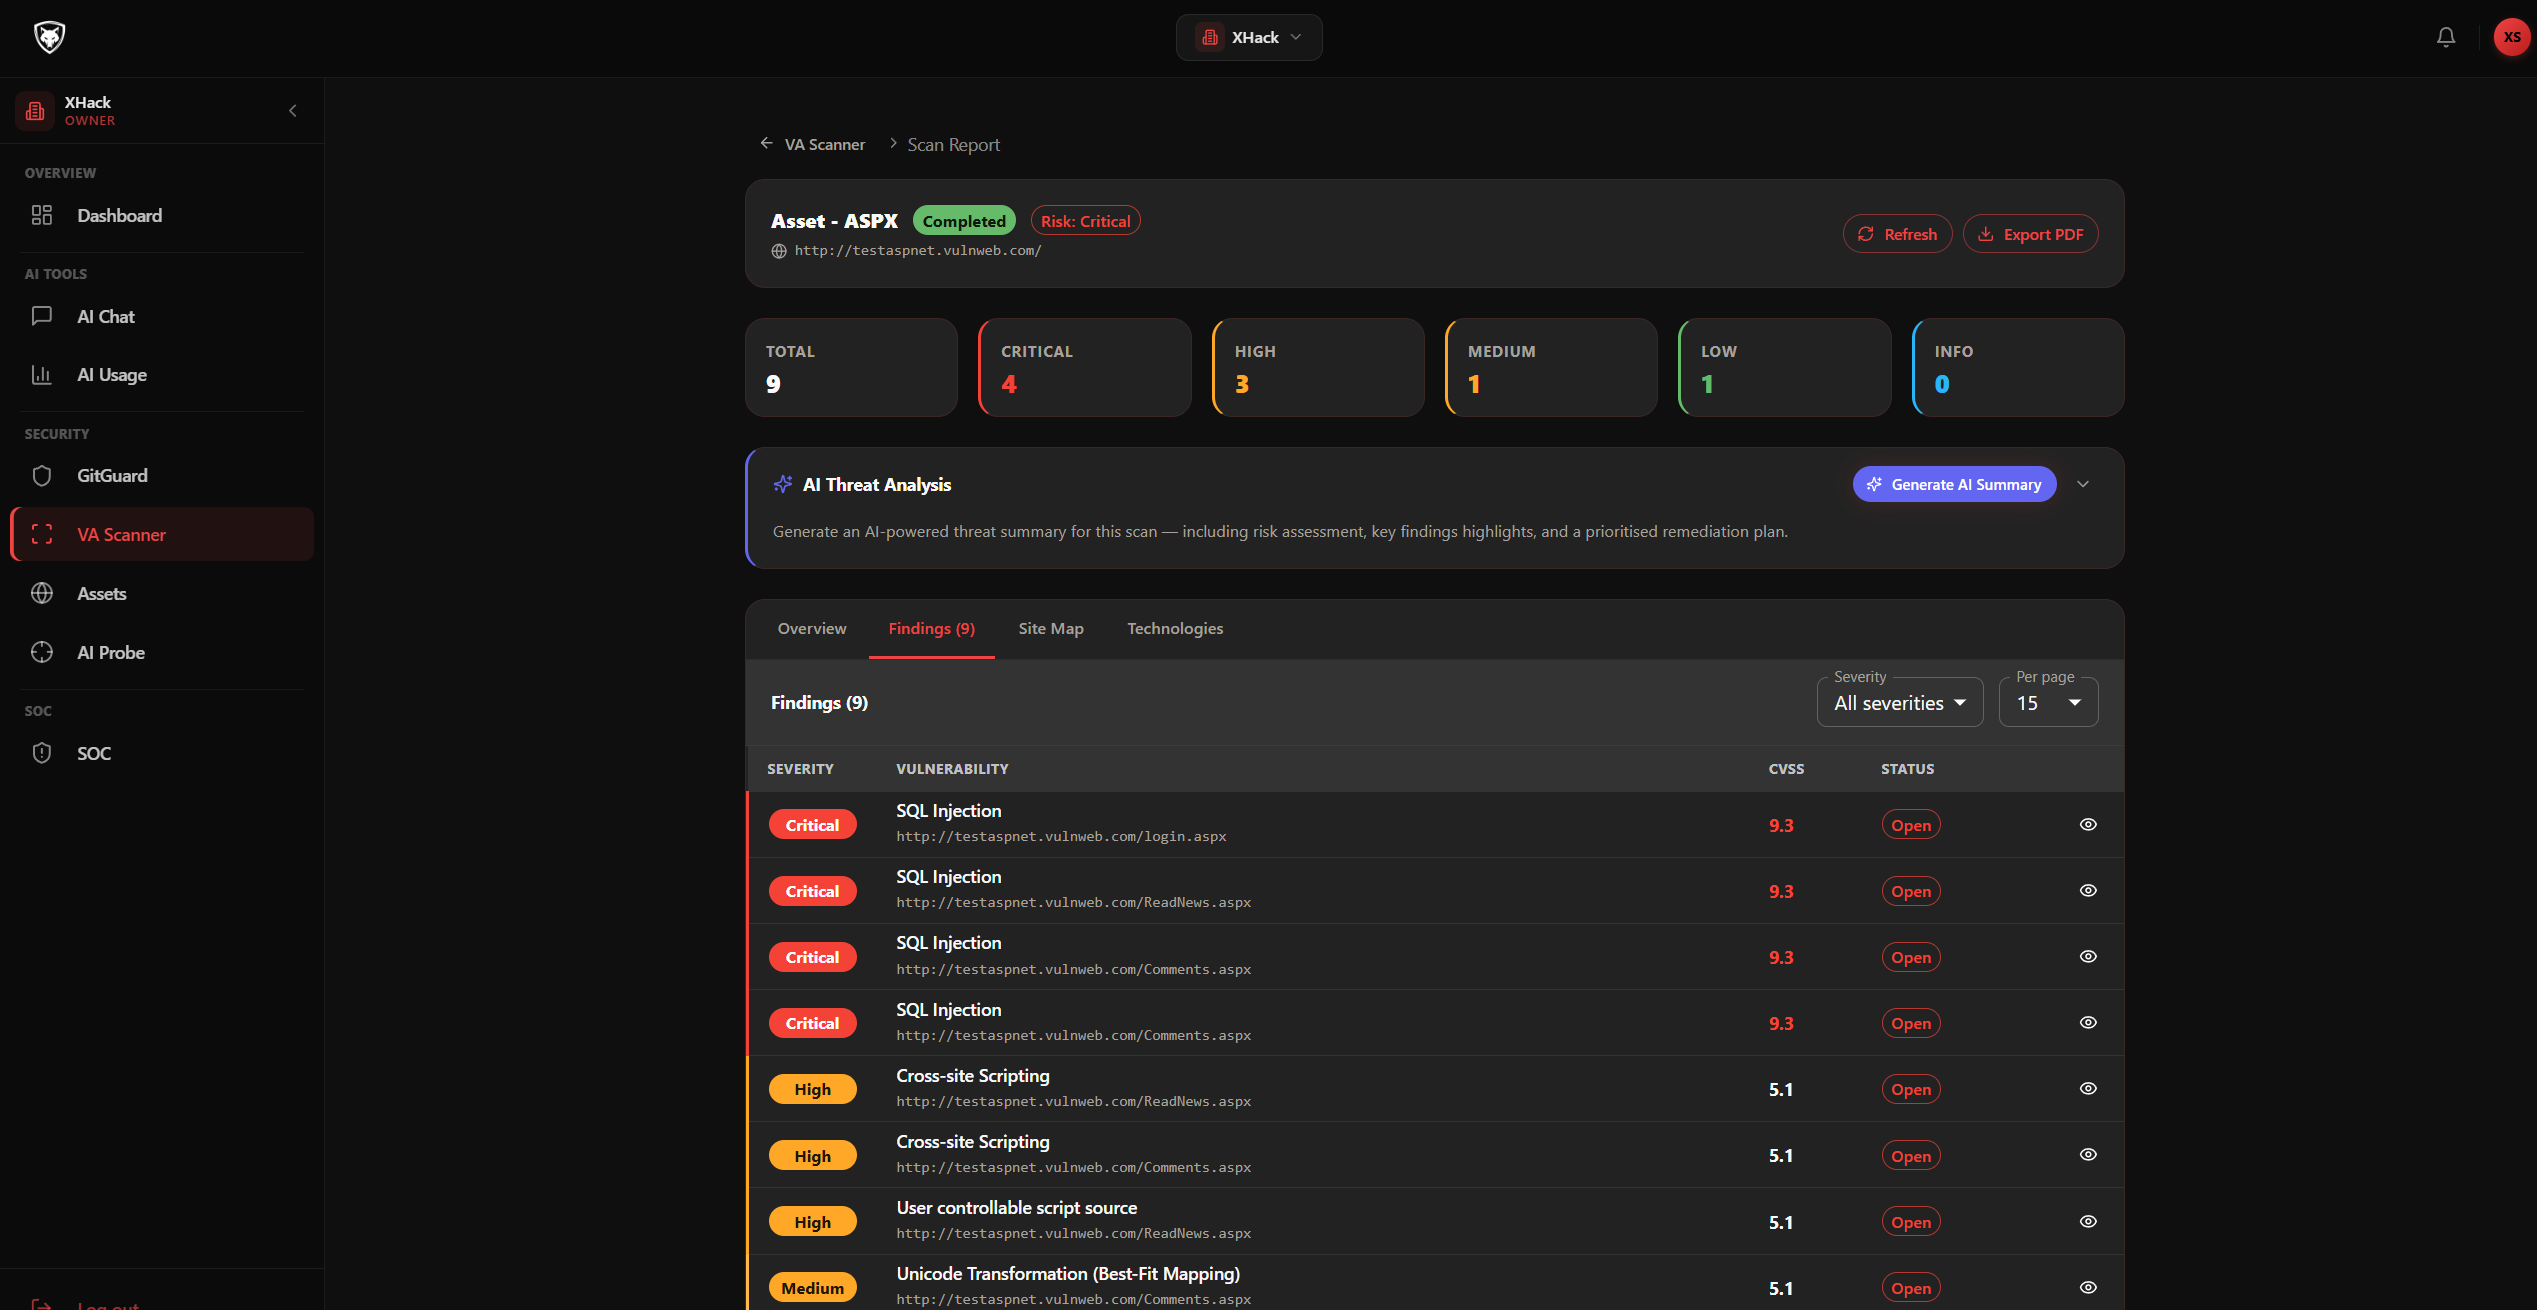
Each row shows: severity chip, title, location, and confidence. Click a row to open the full finding view.
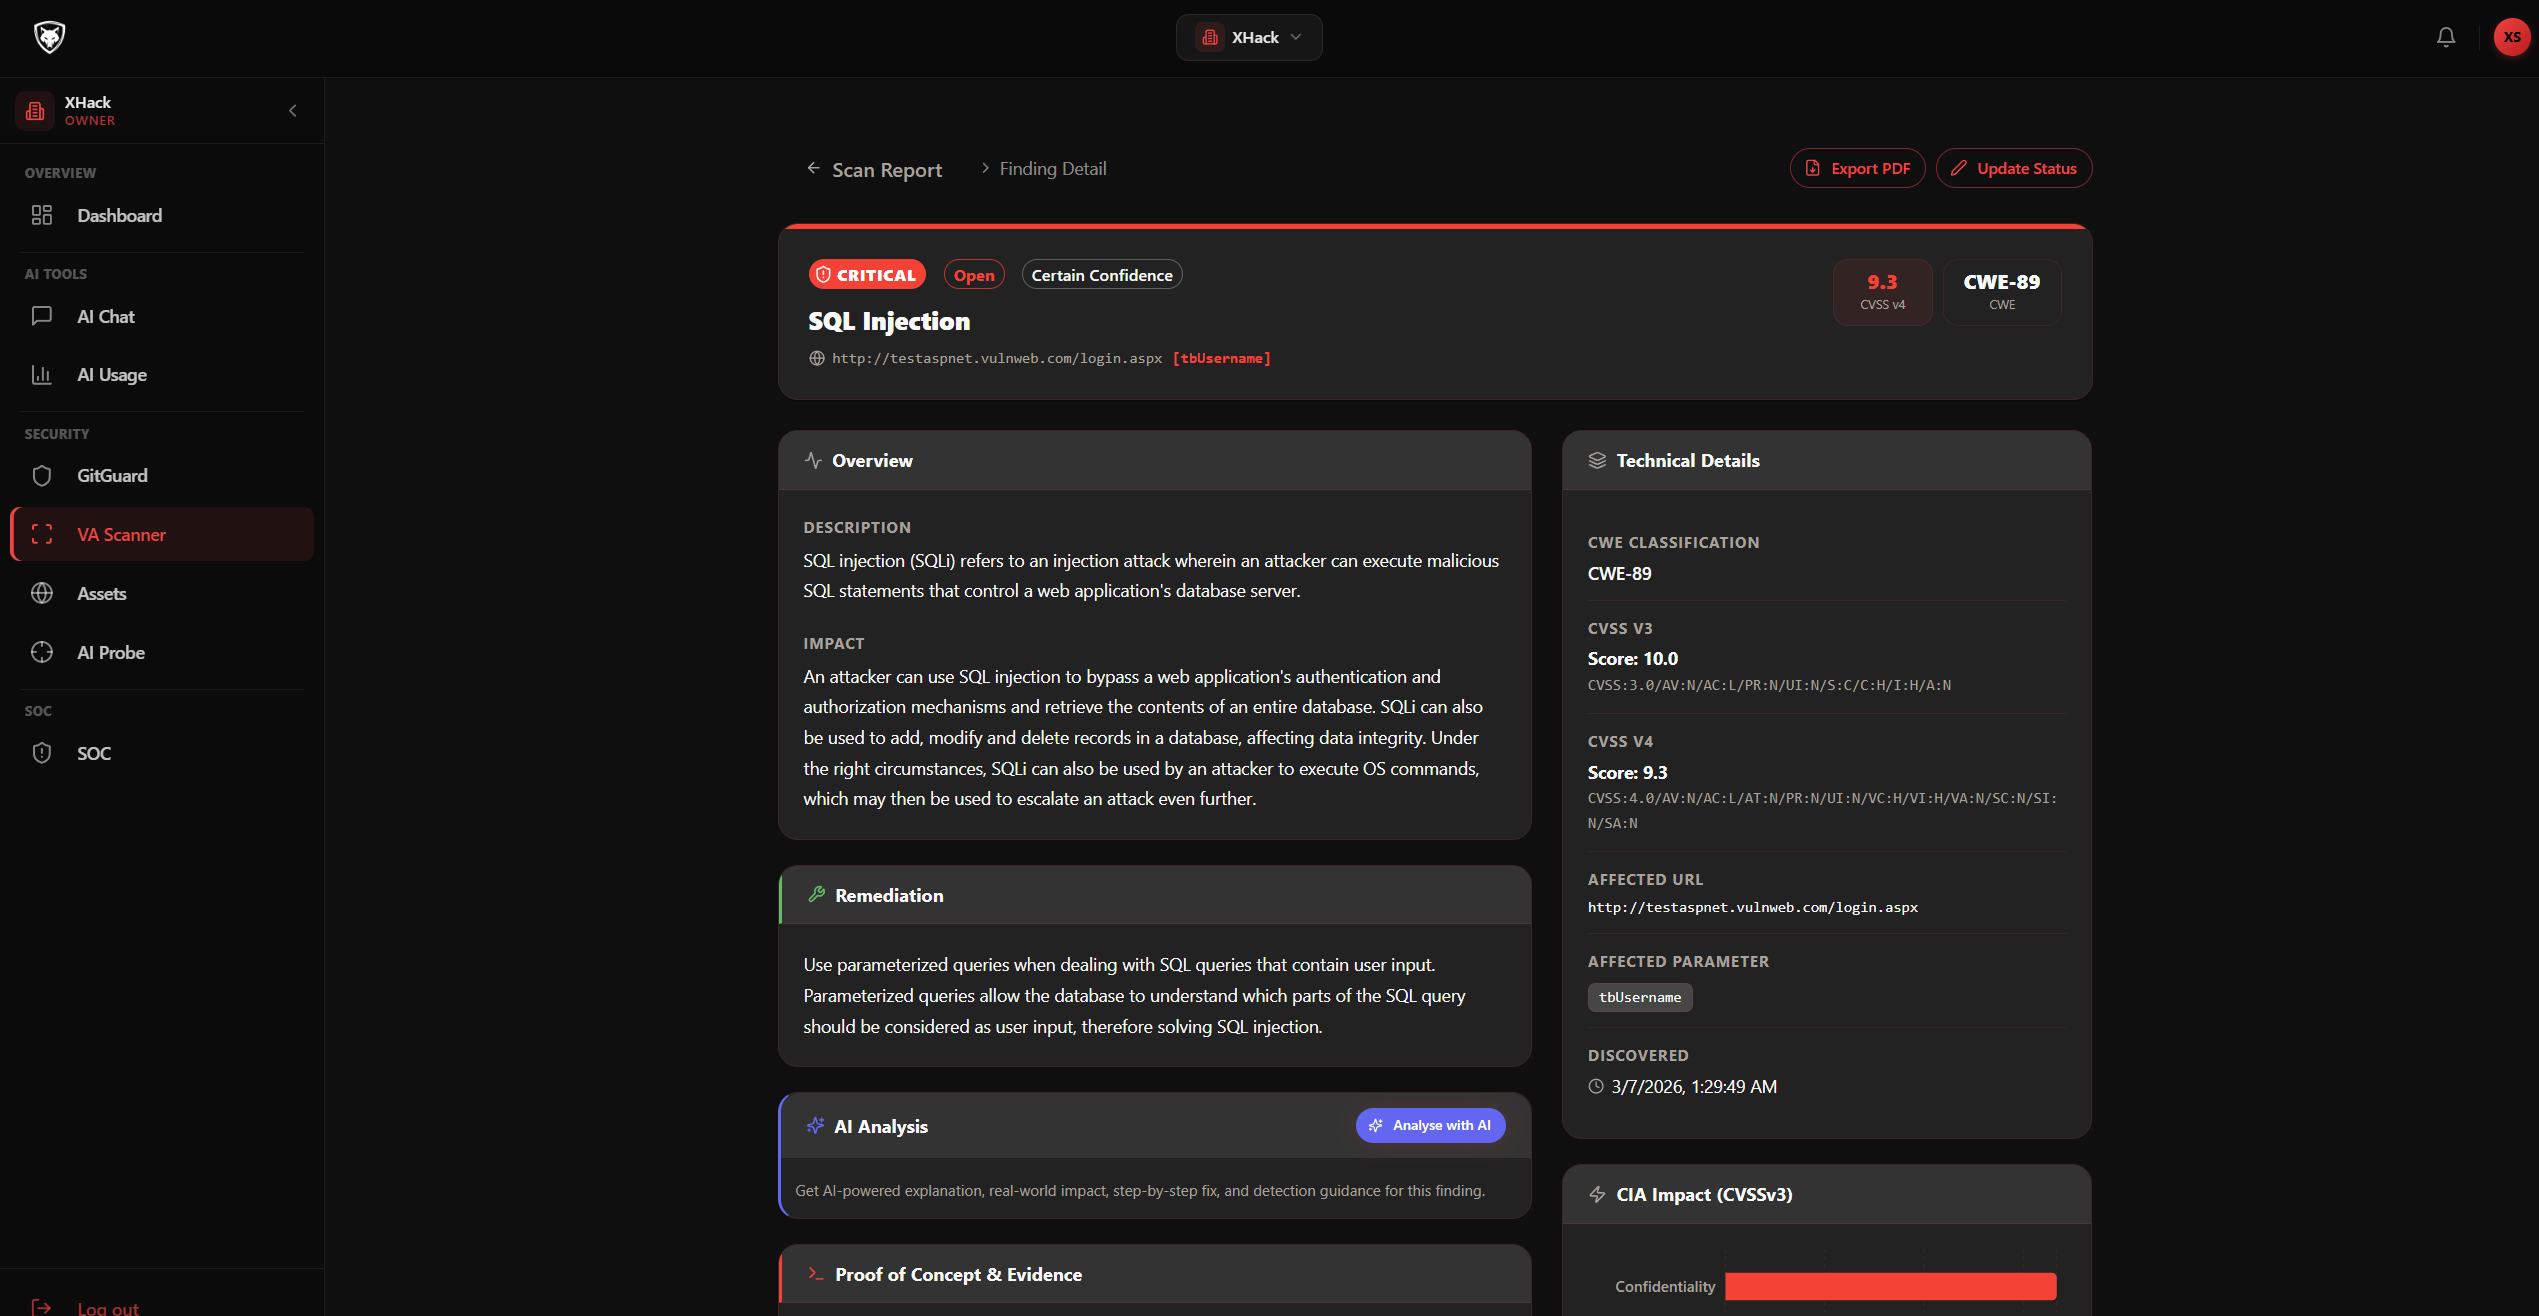
The finding view contains:
- Severity — Critical / High / Medium / Low / Info
- Location — the URL, parameter, header, or file affected
- Evidence — the request that triggered the finding and the response that confirmed it
- Exploit Scenario — what an attacker could do with this
- Recommended Fix — concrete steps to remediate
- AI Mitigation Plan — generated guidance with an audience switcher
The audience switcher at the top of the mitigation plan lets you toggle between three views:
- Developer — the diff-level fix, code snippets, configuration changes
- Project Manager — rollout steps, timeline, dependencies
- Executive — business impact, risk, the one-line summary for leadership
Switch views before sharing — pick the one that matches who you're sending it to.
Step 4 — Filter and triage
Once a scan has dozens of findings, use the filters at the top of the Vulnerabilities tab:
- Severity — show only critical, high, etc.
- Status — open, fixed, accepted, false positive
- Search — match title or location text
To mark a finding as fixed, false positive, or accepted, open it and use the status dropdown at the top. The change is recorded with your username and timestamp in the finding's audit log.
Step 5 — Export a report
When the scan finishes (or whenever you need a snapshot):
- Click Export in the scan detail header.
- Pick PDF or HTML.
- Optionally filter by severity (e.g. only Critical + High in the executive PDF).
- Click Generate.
- Download the file when it's ready.
The report includes the executive summary, severity breakdown, list of findings, and the AI mitigation plans for each one.
Plan limits and quotas
Monthly scan quotas vary by plan:
| Plan | Scans per month |
|---|---|
| Starter | 2 |
| Premium | 5 |
| Elite | 12 |
Quota is checked before a scan starts. If you've hit your monthly limit, the Start scan button is disabled and a message tells you how many days until reset.
If you delete a scan within 24 hours of starting it, the quota is refunded. After 24 hours, the scan counts permanently — even if you delete it.
You can see your current usage in Settings → Billing.
Tips and best practices
- Verify assets before scanning. Unverified assets cannot be scanned. The platform refuses to scan property you haven't proven you own.
- Don't scan during peak traffic unless you have to. VA scans send real requests and can generate noticeable load on production.
- Use scheduled re-scans for critical assets. A clean scan today doesn't mean clean tomorrow. Re-scan key assets monthly.
- Triage critical findings first. The mitigation audience switcher exists because a critical finding usually needs both a developer and an executive in the loop within hours.
- Save your quota for what matters. Each scan counts. Don't burn a scan on a staging environment unless you're testing the scanner itself.
- Connect Slack notifications. Subscribe to
va_scan_completeandva_vulnerability_foundevents so the right people know without having to check the dashboard.
Privacy
Scans, findings, evidence, and AI mitigation plans are scoped to your tenant. Raw evidence (request/response captures) is encrypted at rest. You can hard-delete any scan along with all its findings at any time — the deletion cascades to evidence and mitigation plans.
Related
Try XHack AI Now
Experience the full power of XHack directly in your browser. No installation required.
Launch XHack AI