
Identity Verification (Researchers)
Complete guide to identity verification for researcher and individual accounts — what to upload, how the four-step wizard works, how long review takes, and what to do if you are rejected.
Identity Verification for Researchers
Every XHack account is verified before it can be used. This guide covers the researcher / individual path from a fresh signup to an approved account. Registering an organisation instead? See Identity Verification (Companies) — that wizard differs.
Verification takes about five minutes of your time. Review is usually decided within one business day.
Why XHack verifies identity
XHack is not a general-purpose AI product. An approved account can install a monitoring agent that runs with root privileges, launch vulnerability scans, generate working exploit code, and run adversarial probes against live systems. That is real offensive capability, and we confirm who is holding it before we hand it over.
Two consequences follow, and both work in your favour:
- Verification happens before payment. You are never charged during this process. If we cannot approve you, there is nothing to refund and no subscription to cancel.
- Your documents are encrypted before storage. Files are encrypted at rest with AES-256-GCM. Reviewers access them through a single audited endpoint, and every access is logged. Documents are never returned by any listing API.
Before you start
Have these ready:
| What | Notes |
|---|---|
| Government ID or passport | Both sides, as two separate images |
| A professional credential | OSCP, CEH, CISSP, a security-related diploma, or similar |
| A verification link (optional) | A public page confirming your credential, e.g. a Credly badge |
| LinkedIn URL (optional) | Speeds up review, but is not required |
File requirements: PNG, JPEG or PDF, maximum 5 MB per file. Photos are fine — a phone camera shot is acceptable as long as all four corners are visible and the text is legible.
You must confirm your email address before the wizard appears. If you have not received that email, check spam before requesting another.
Step 1 — Prove your identity
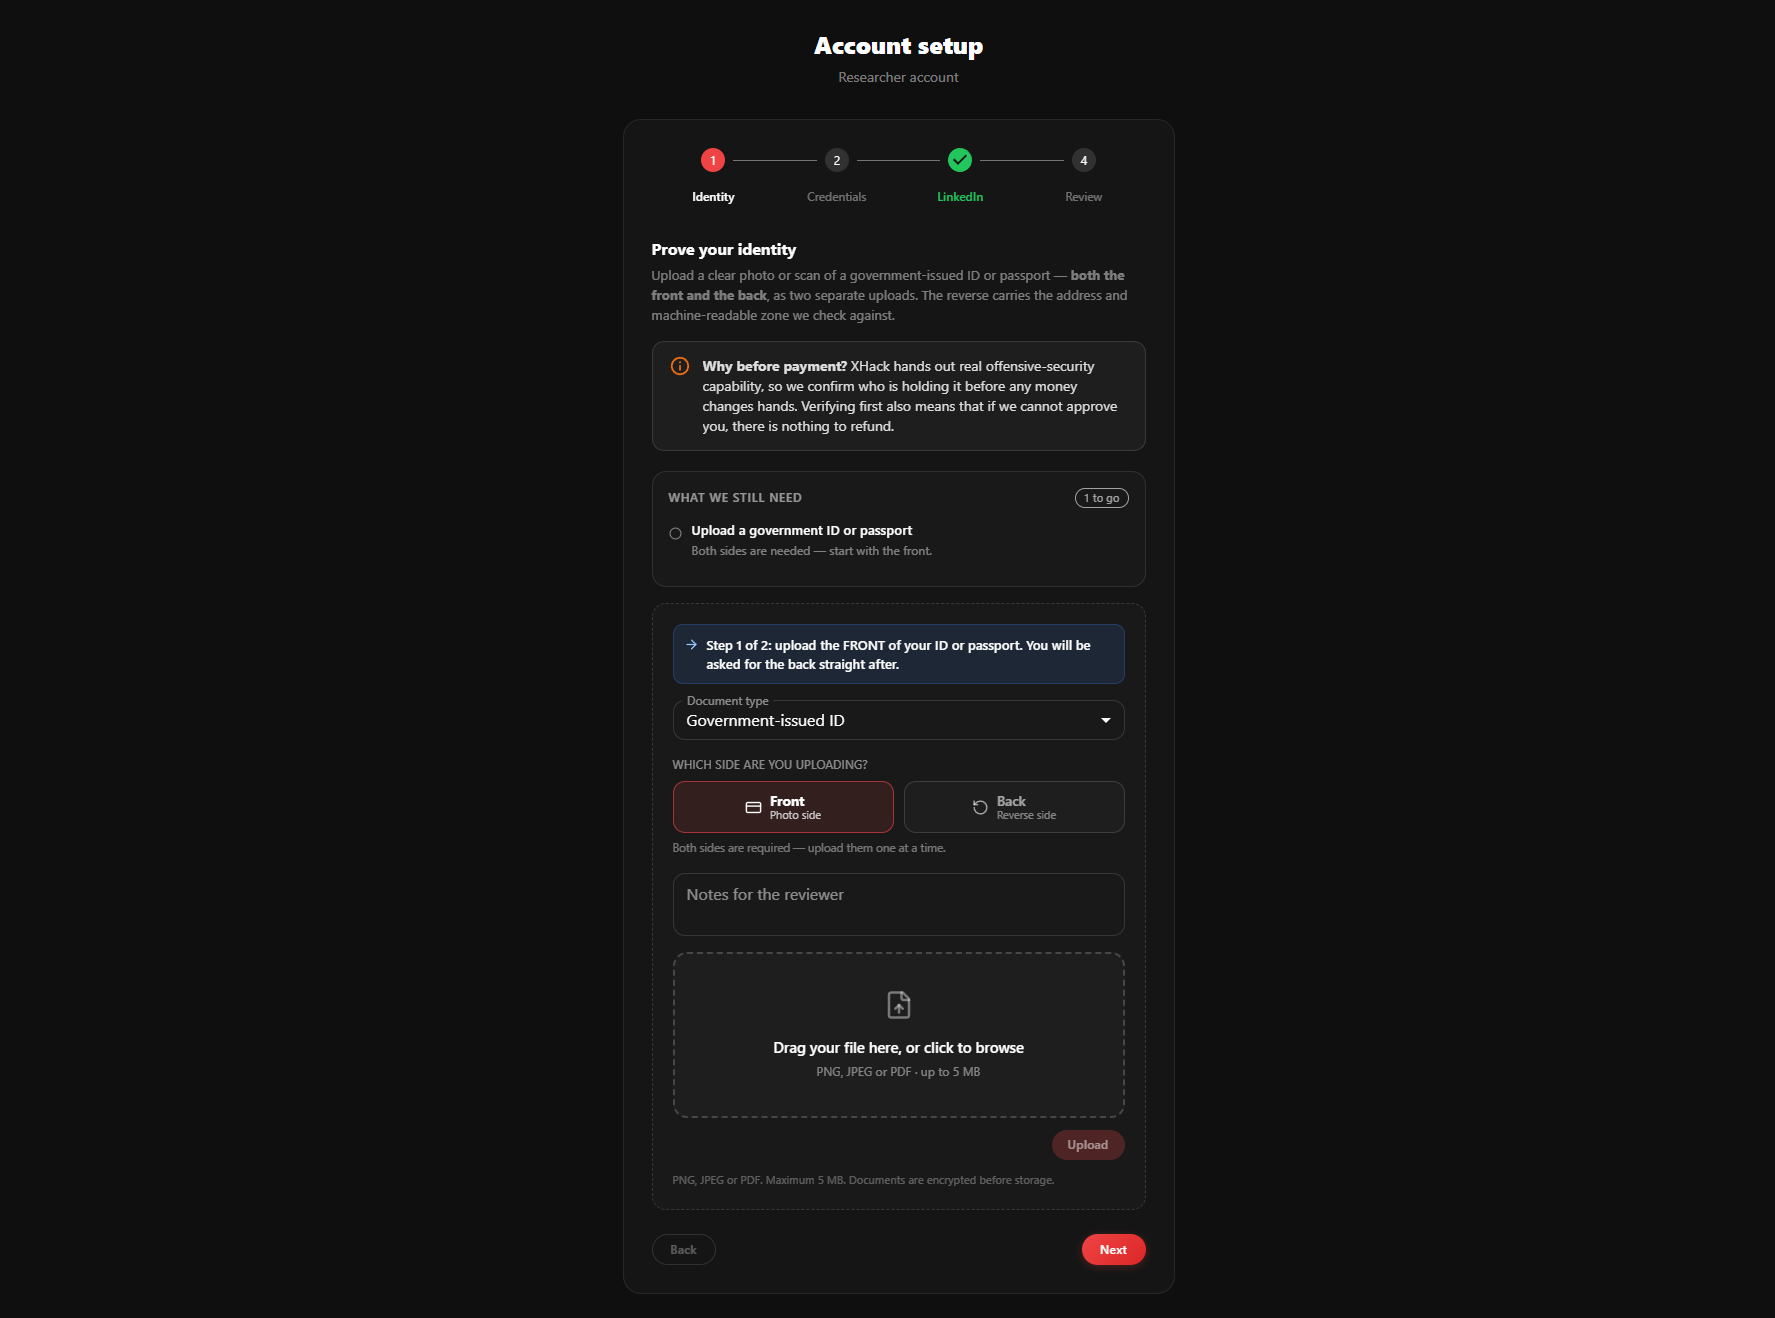
Upload a government-issued ID or a passport. Both sides are required, uploaded one at a time — the reverse carries the address and the machine-readable zone we check against, so a front-only submission cannot be approved.
- Choose Document type — Government-issued ID or Passport.
- Under Which side are you uploading?, the Front button is selected for you. Front is the photo side.
- Drag your file into the drop zone, or click it to browse.
- The upload starts as soon as the file is accepted.
Once the front lands, the form switches itself to Back and the Front button turns green with an Uploaded label. Upload the reverse the same way. When both sides are in, the panel reads "Both sides received."
The What we still need panel at the top of the step tracks this live. It is generated by the same rules the server enforces when you submit, so if it says an item is outstanding, submission will genuinely be refused until you provide it.
Notes for the reviewer is an optional free-text box on every upload. Use it when something needs explaining — a maiden name that differs from your ID, a document in a language other than English, or a reference number worth quoting.
Getting a usable photo
Most rejections are avoidable image problems:
- All four corners in frame; nothing cropped
- No glare across the photo or the machine-readable zone
- In focus, with the document filling most of the frame
- The original document — not a photocopy of a photocopy, and not a screen showing the document
- Nothing obscured. Do not redact the number, the date of birth, or the MRZ
Your ID must be valid on the day you submit. An expired document is refused.
Step 2 — Professional credentials
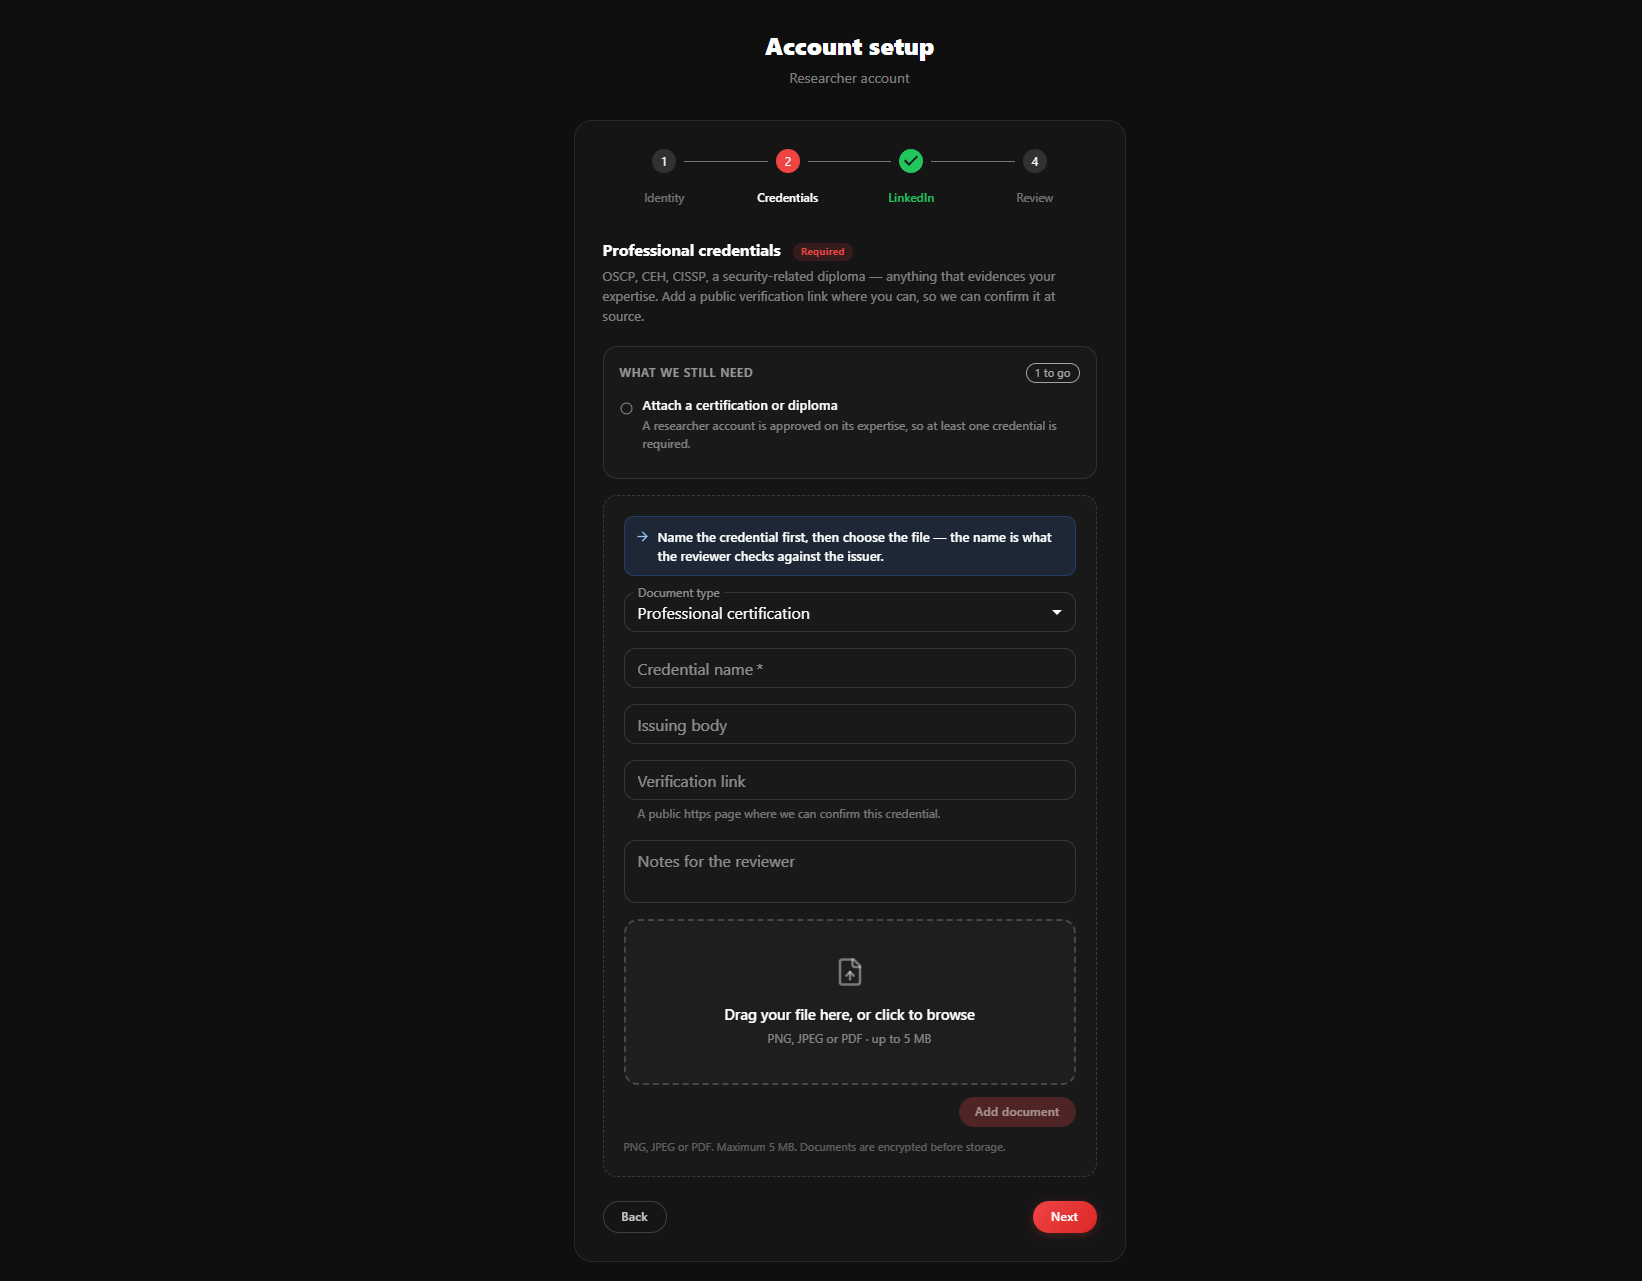
A researcher account is approved on demonstrated expertise, so at least one credential is required. This is the step that distinguishes a researcher account from a company one.
Accepted evidence:
- Professional certification — OSCP, OSEP, OSWE, CEH, CISSP, GPEN, GWAPT, Security+, and equivalents
- Education diploma — a degree or diploma in computer science, information security, or a related field
For each credential:
- Choose Document type — Professional certification or Education diploma.
- Credential name (required) — the exact name, e.g.
OSCPorBSc Computer Science. This is what the reviewer checks against the issuer, so an accurate name speeds things up considerably. - Issuing body — OffSec, EC-Council, ISC², your university.
- Verification link — a public
httpspage where the credential can be confirmed. A Credly badge URL, an OffSec verification page, or a university register entry. This is the single most useful thing you can add: a credential we can confirm at source rarely needs a second look. - Attach the certificate file and click Add document.
You can add as many credentials as you like. One is enough to submit; two or three with verification links makes for a faster decision.
Unlike identity documents, credential uploads wait for you to type the name before they send — the file picker will not auto-upload until Credential name is filled in.
Step 3 — LinkedIn profile
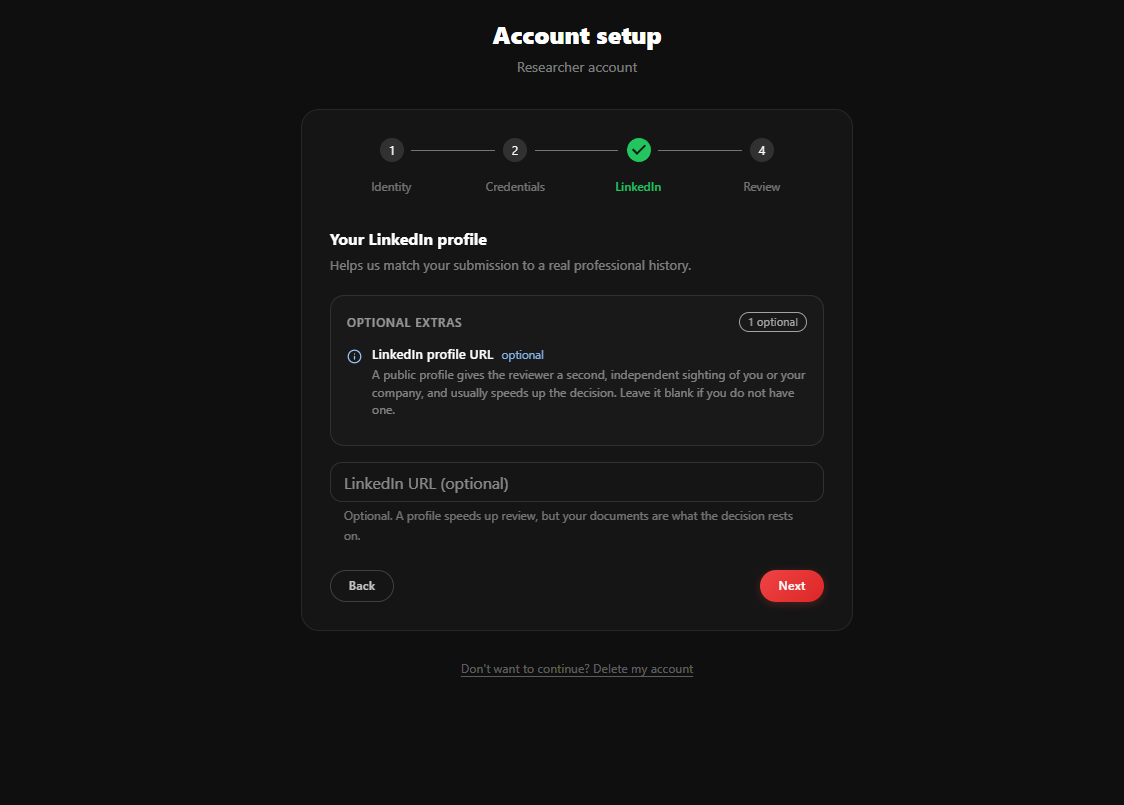
This step is optional. A public profile gives the reviewer a second, independent sighting of you and usually shortens review, but the decision rests on your documents. Leave it blank if you do not have one.
If you do supply it, the URL must be a real LinkedIn profile or company page — https://www.linkedin.com/in/your-name or /company/your-company. Other URLs are rejected by design: an open URL field would let an applicant park an arbitrary link in front of a reviewer who is about to click it.
Step 4 — Review and submit
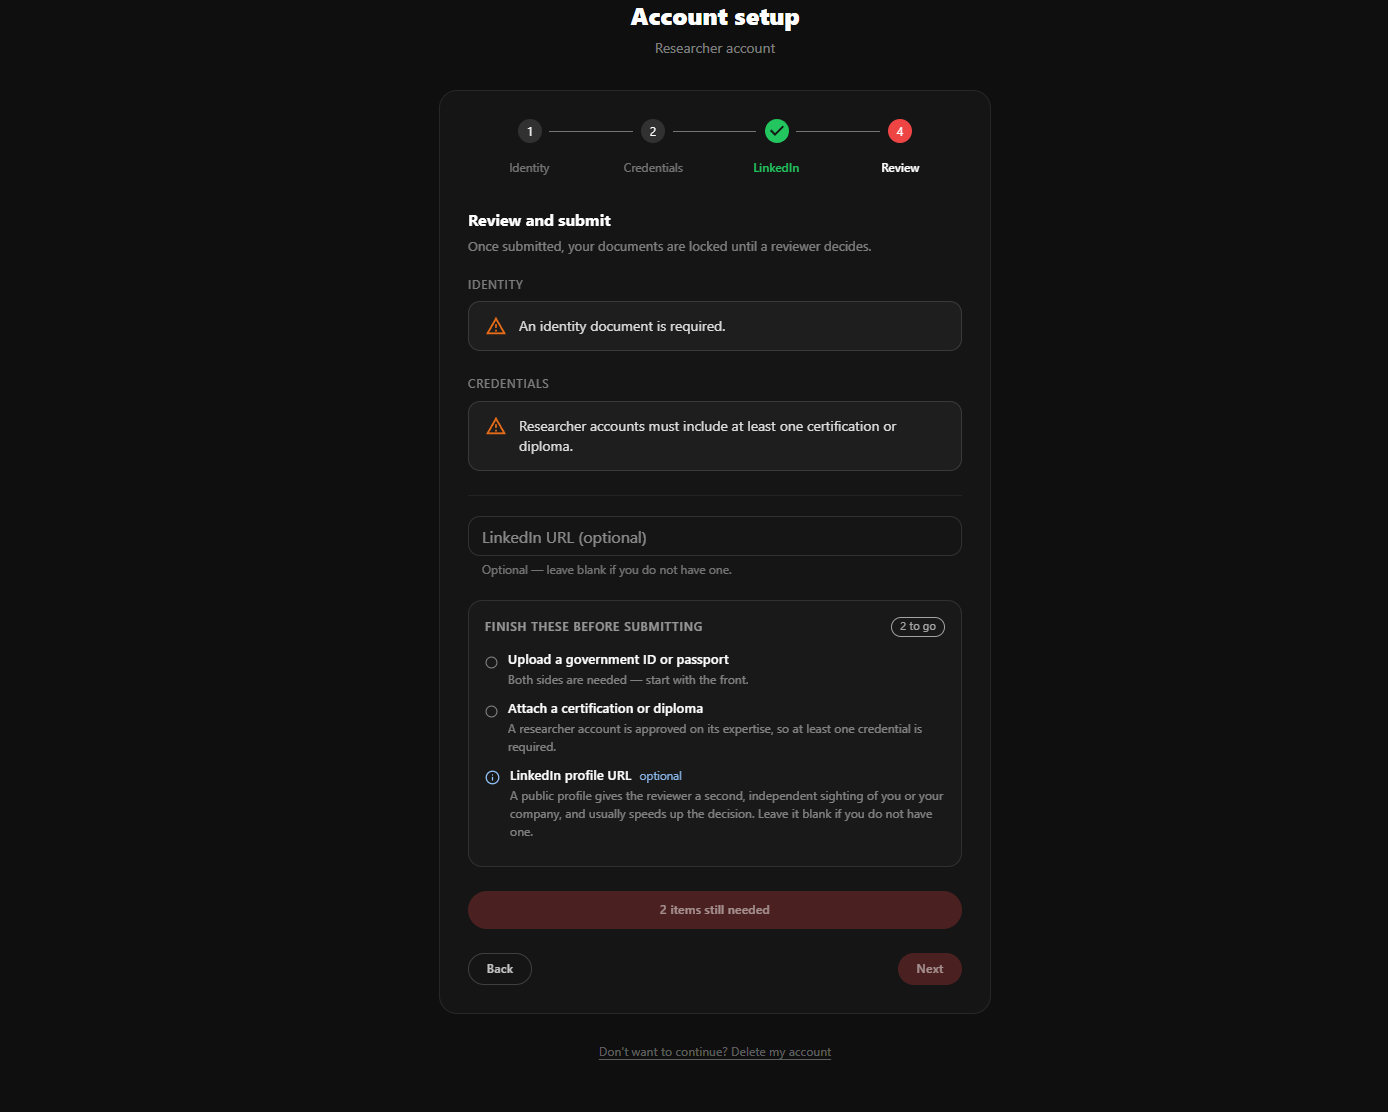
The final step summarises what you have attached and lists anything still outstanding under Finish these before submitting.
The submit button stays disabled while required items are missing, and tells you how many — "2 items still needed" rather than a greyed-out control with no explanation. Optional items are labelled optional and never block you.
To be submittable, a researcher account needs:
- Front and back of one government ID or passport
- At least one certification or diploma
Click Submit for review when the checklist is clear.
What happens next
Your submission is locked once sent. Documents cannot be added, removed or swapped while a reviewer is looking at them — if you spot a mistake immediately after submitting, contact support rather than waiting for a rejection.
You will receive an email when the decision is made, usually within one business day.
After approval
Approval unlocks the rest of onboarding: choose a plan, complete payment, and create your workspace. Depending on current promotions, an approved identity may also grant a trial period automatically.
Your verified status carries across the platform. If you later create an organisation and invite colleagues, they can inherit your workspace's verification instead of each submitting their own — see member auto-verify in workspace settings.
If you are rejected
A rejection is not the end of the application. The email states the reason, and the same reason appears at the top of the wizard when you return.
Your case reopens for editing. Remove whatever was wrong, upload a replacement, and submit again — everything else you entered is preserved, including your business details and LinkedIn URL, so you are not retyping the form.
Common reasons:
| Reason | Fix |
|---|---|
| Only one side of the ID uploaded | Upload the reverse as a separate file |
| Image unreadable, glare, or cropped | Retake in even light with all corners visible |
| Document expired | Use a currently valid document |
| Name mismatch between ID and credential | Explain it in Notes for the reviewer |
| Credential could not be confirmed | Add a public verification link |
| Credential not security-related | Attach a relevant certification instead |
Starting over, or leaving
Two escape hatches exist while your case is editable — that is, before you submit, or after a rejection.
Delete verification and start over sits at the bottom of the review step. It destroys every uploaded document and resets the case to empty. Use it if you uploaded the wrong person's documents or want a clean slate.
Delete my account is the small link below the setup card. It closes the account entirely, with a 30-day window in which support can restore it. It asks for your password to confirm. Neither action is available once a case is under review or approved — at that point, contact support.
Registering an organisation instead?
Company accounts follow a different wizard — credentials become optional, and registered entity details become mandatory. See Identity Verification (Companies).
Privacy and retention
- Documents are encrypted with AES-256-GCM before they touch the database.
- No listing or detail API returns document contents. Reviewers use a single dedicated endpoint, and every access writes an audit log entry naming the reviewer, the document, and the time.
- Your own case is addressed only through your session. There is no user identifier in the URL to tamper with, so one applicant cannot reach another's documents.
- Deleting your verification destroys the stored files immediately.
- Reviewer notes are internal. Only the rejection reason is ever shown to you.
For the full policy, see Privacy & Data Policy.
Troubleshooting
The wizard does not appear. You have not confirmed your email address yet. Check spam, then request another verification mail.
Upload fails immediately. The file is over 5 MB, or is not PNG, JPEG or PDF. A phone photo is often 8–12 MB — reduce the resolution or export as JPEG.
The checklist still shows an item I uploaded. Reload the page. If it persists, the upload was rejected server-side; check for an error message on the upload panel.
Submit is disabled and I cannot see why. The Finish these before submitting panel immediately above the button lists every outstanding item with the reason it is needed.
I own an organisation and cannot delete my account. Transfer ownership of the workspace first, or delete the workspace. The account deletion endpoint refuses while you still own an organisation, and names the ones blocking it.
Try XHack AI Now
Experience the full power of XHack directly in your browser. No installation required.
Launch XHack AI