
Attack Chains
Use Attack Chains to correlate alerts across MITRE ATT&CK kill chain stages — create chains, read confidence scores, and respond.
Attack Chains
Attack Chains is the SOC feature that connects isolated alerts into multi-stage attacks. This page shows you how to read the chain list, drill into a chain, build one manually from events, and act on the results.
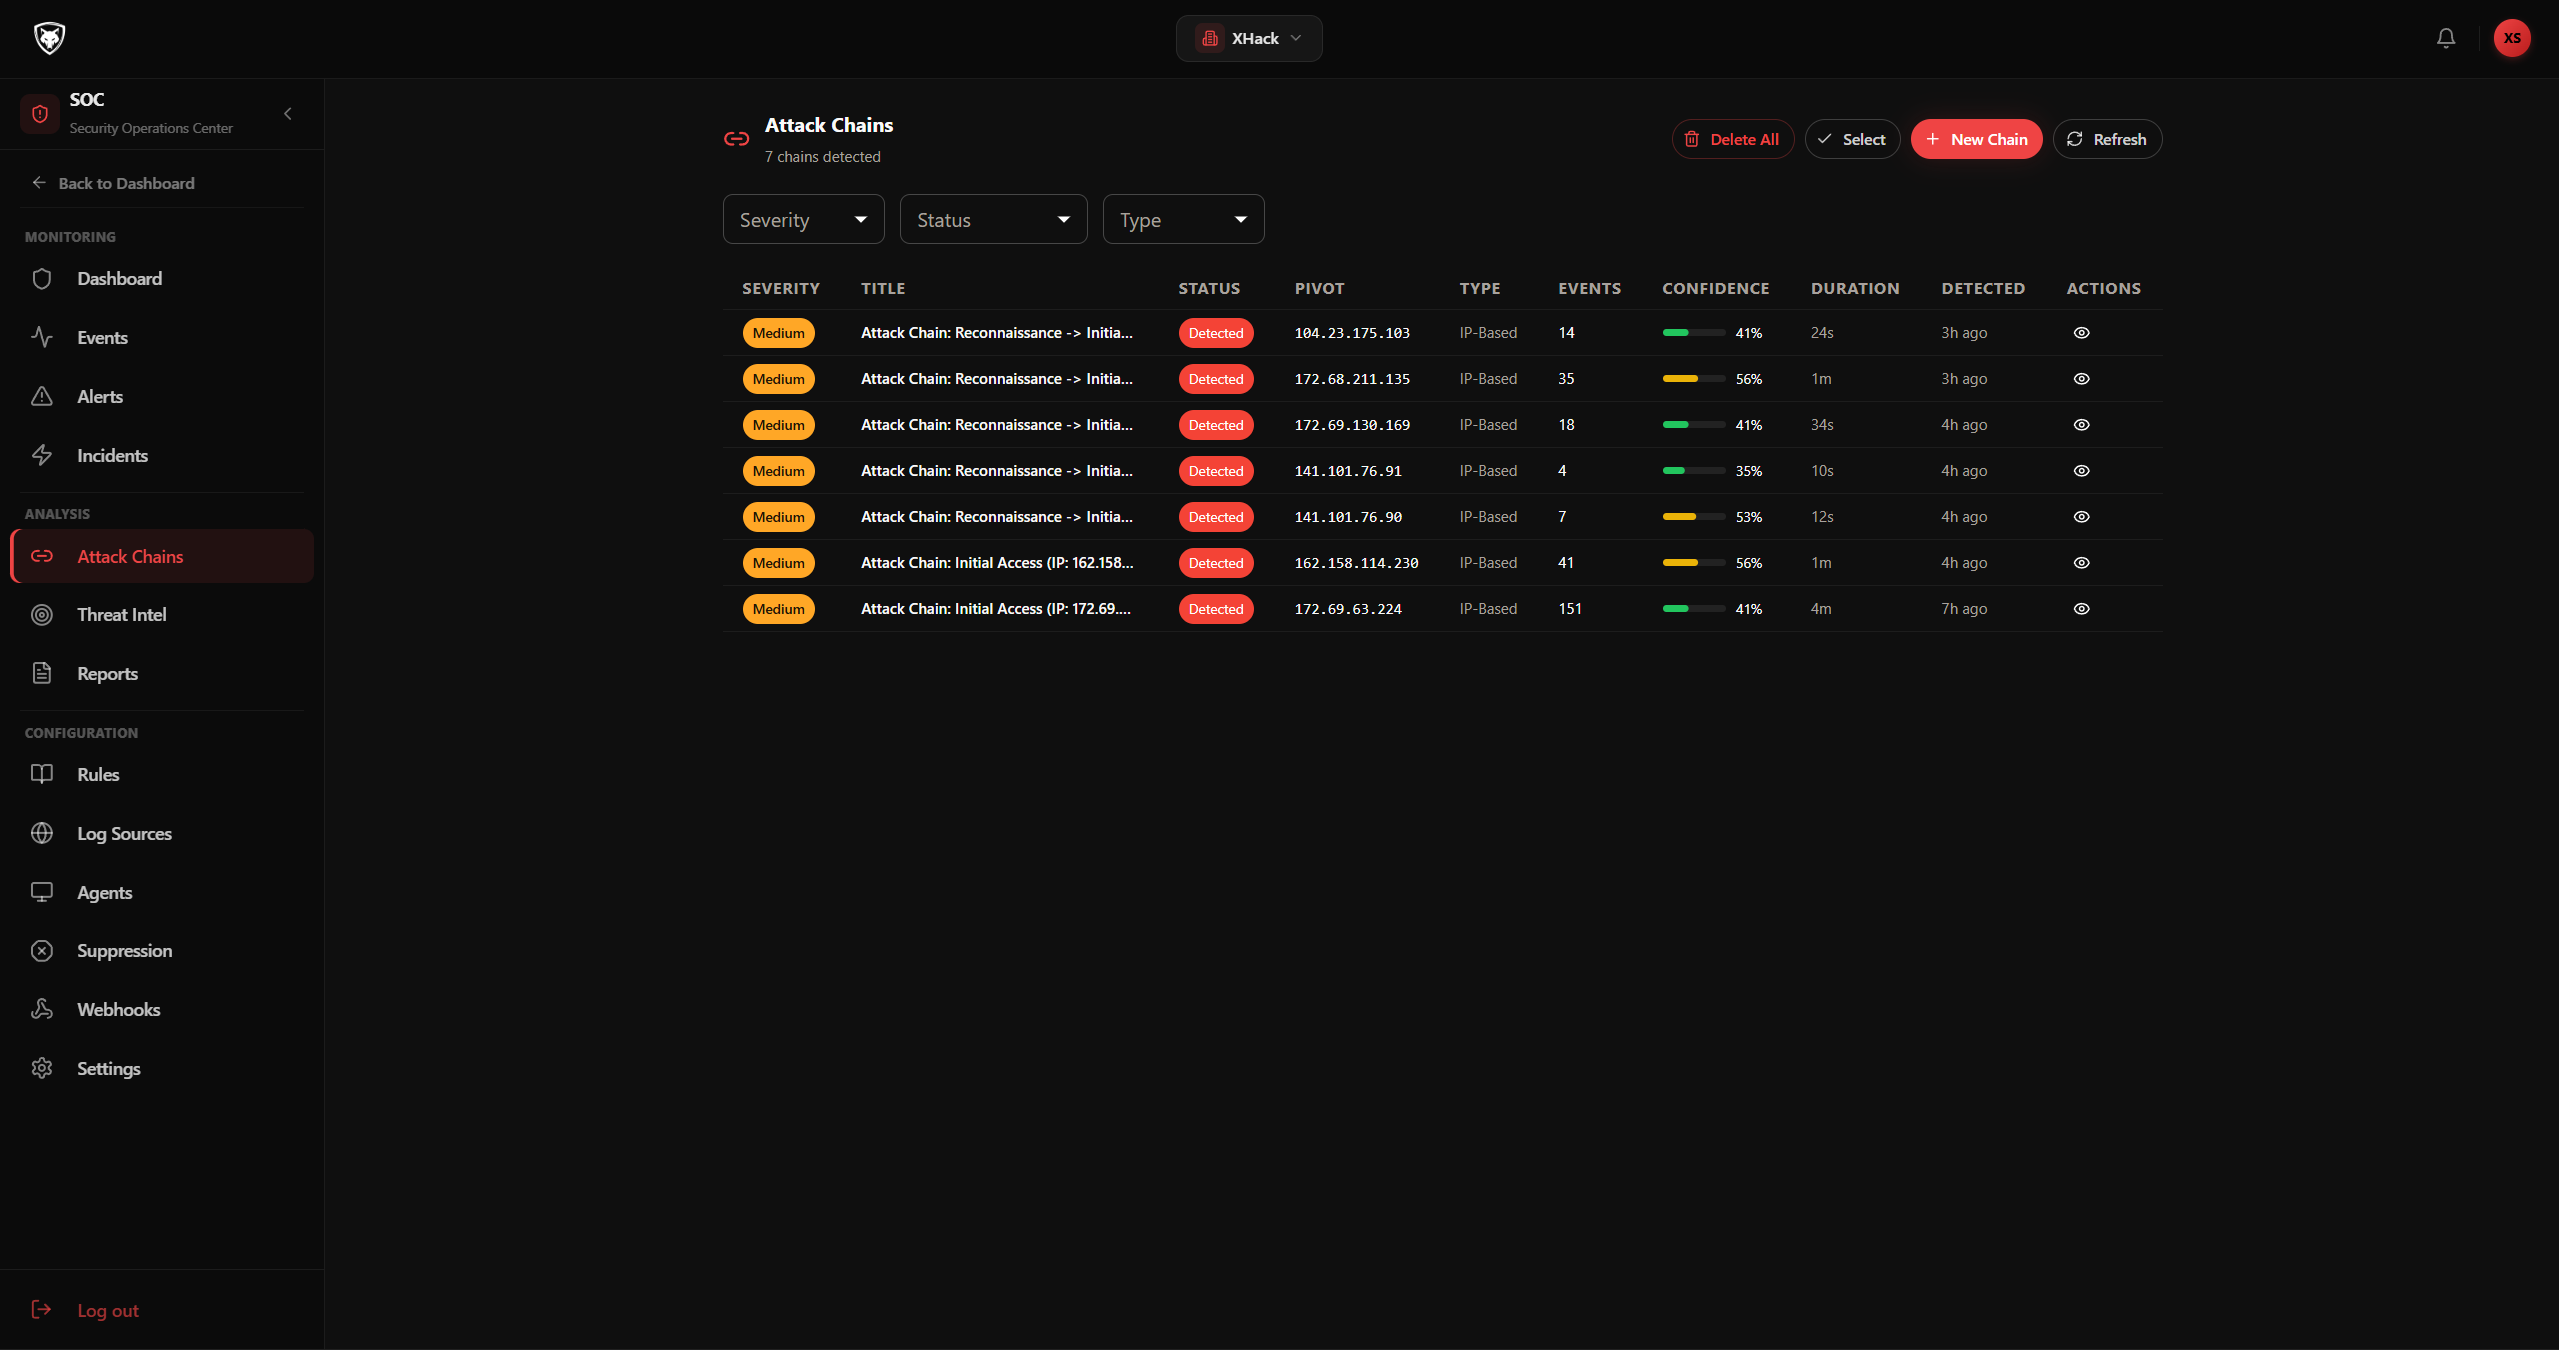
Step 1 — Open the Attack Chains page
Click SOC → Attack Chains in the sidebar. The page shows every active and resolved chain in your tenant.
The table columns are:
- Severity — composite severity (chip)
- Title — auto-generated chain name with MITRE tactic chips below it
- Status —
detected,investigating,confirmed,false_positive, orresolved - Pivot — the IP, user, or hostname the chain pivots on
- Type —
IP-Based,User-Based,Host-Based, orMixed - Events — total contributing events
- Confidence — progress bar showing how confident the detector is (0-100%)
- Duration — how long the chain has been running (e.g.
2d 4h) - Detected — when the chain first appeared
- Actions — View to drill in
Step 2 — Filter the list
The filters at the top let you narrow the view:
- Severity —
All,critical,high,medium,low - Status —
All,detected,investigating,confirmed,false_positive,resolved - Type —
All,ip_based,user_based,host_based,mixed
Click Clear to reset all filters.
Step 3 — Read a chain
Click View on any chain to open the detail page.
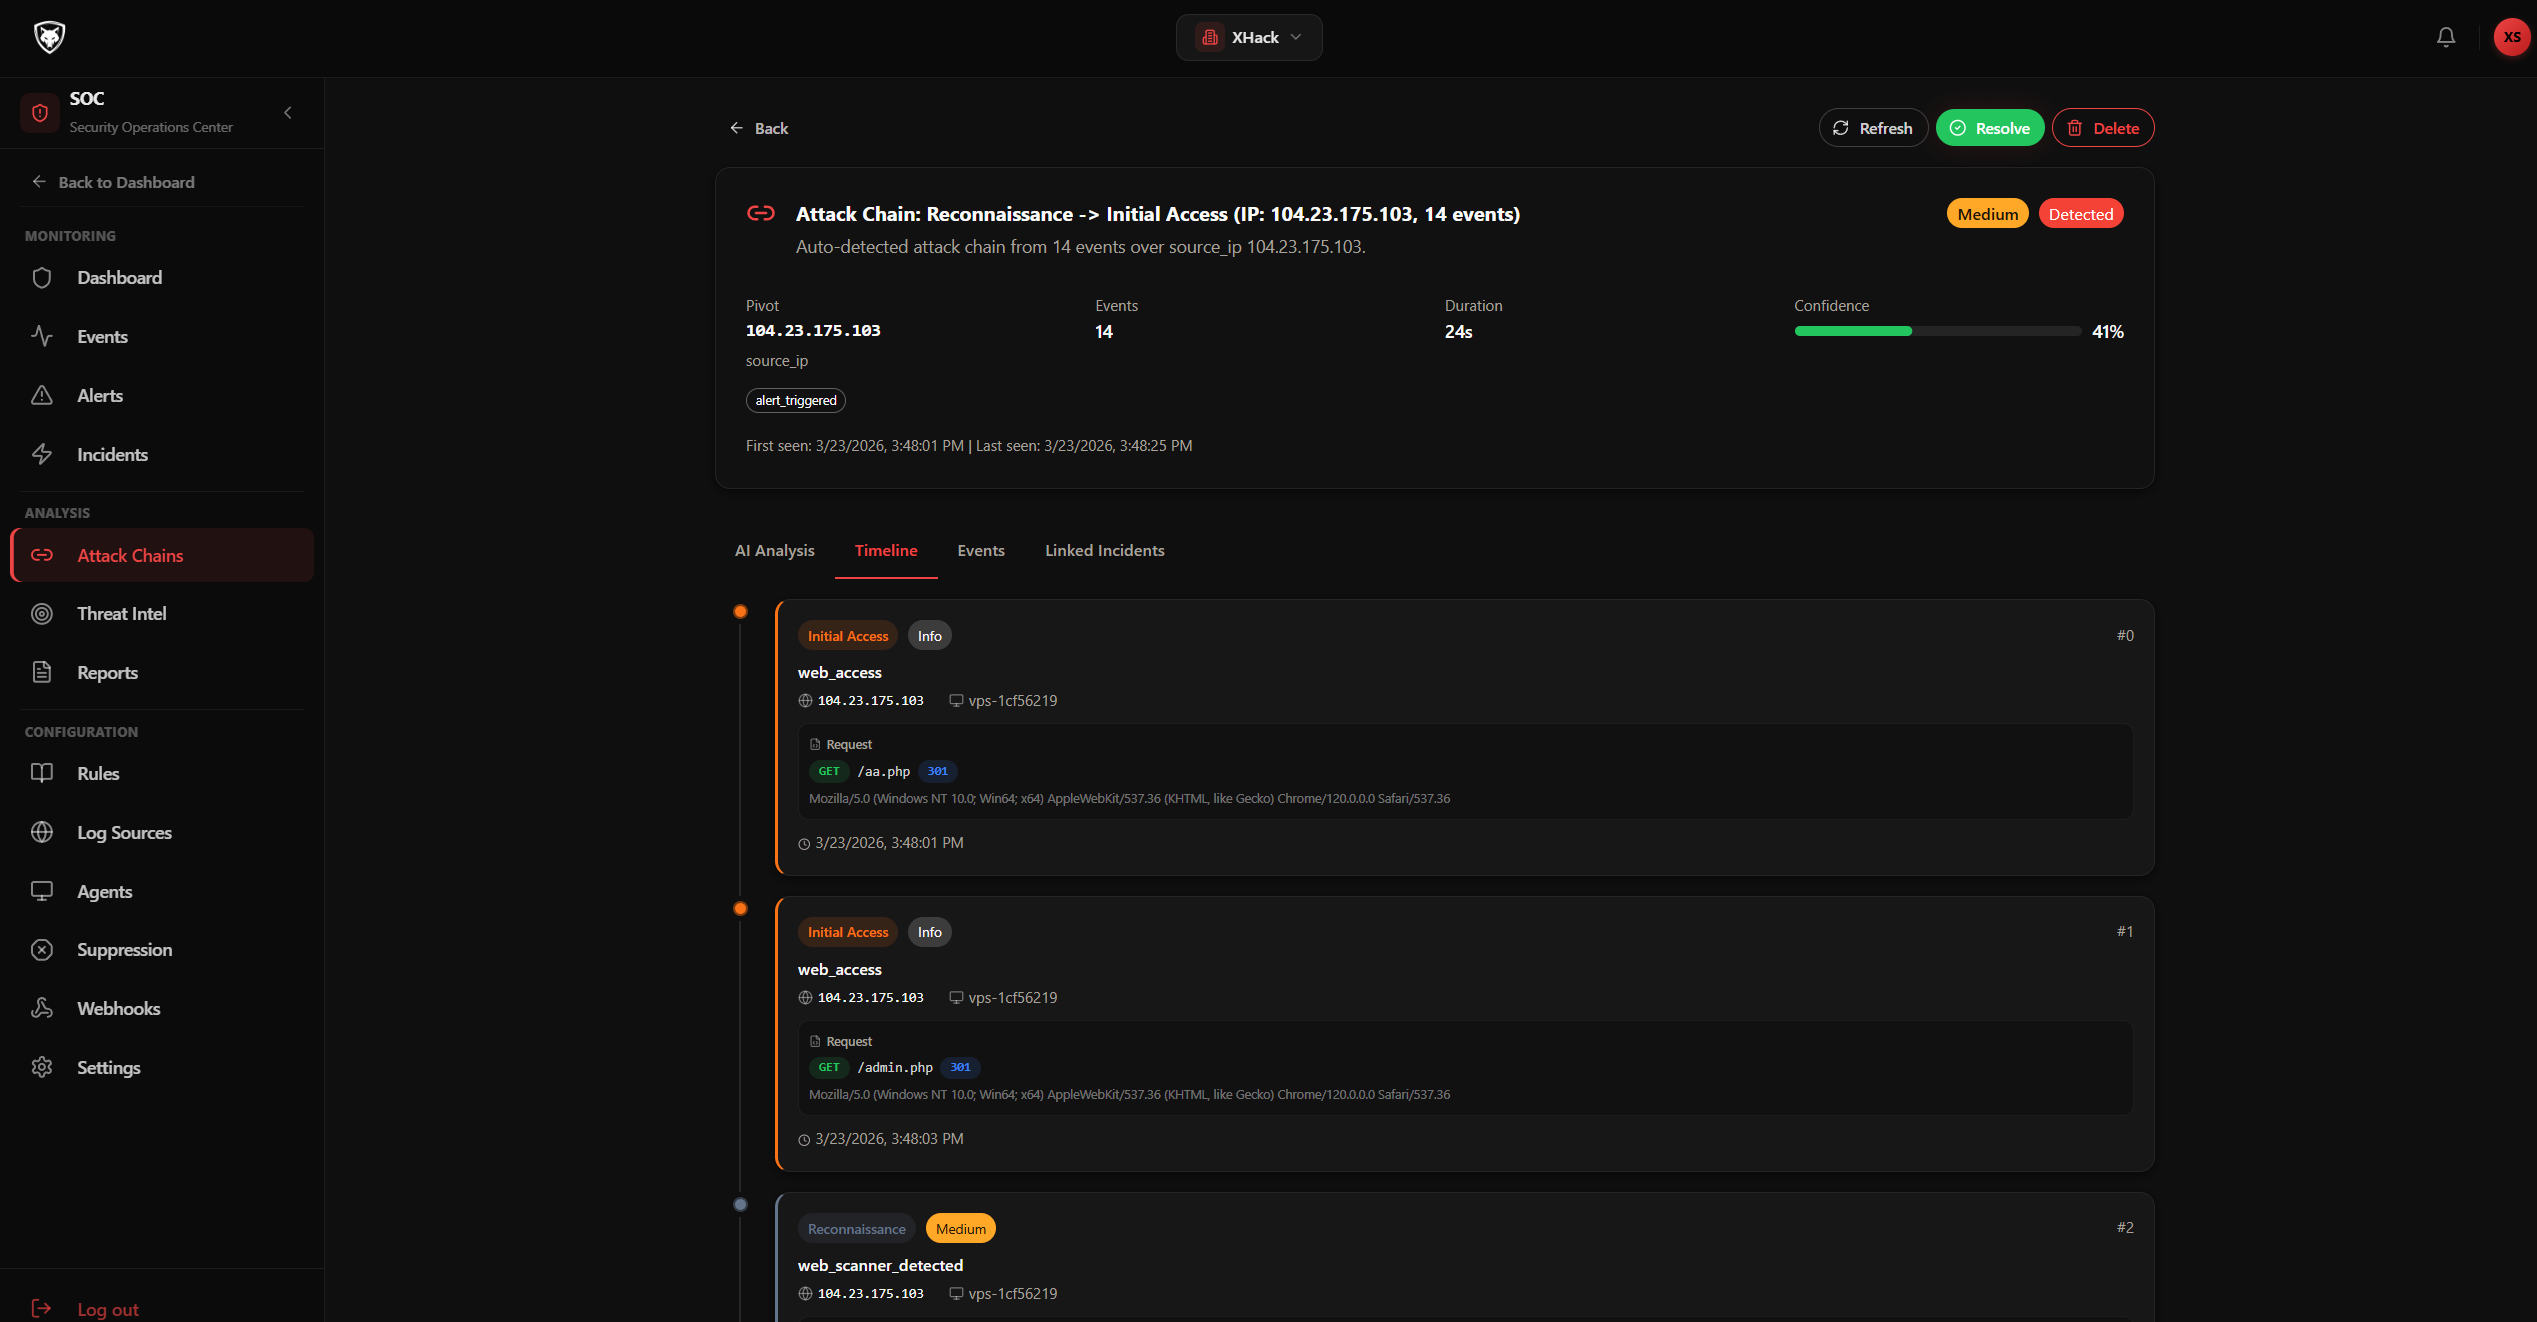
The detail page shows:
- The kill chain stages the attacker has reached, in order: Reconnaissance → Initial Access → Execution → Persistence → Privilege Escalation → Defense Evasion → Credential Access → Discovery → Lateral Movement → Collection → Command & Control → Exfiltration → Impact
- The timeline of contributing events with timestamps
- Each contributing alert with severity, rule name, and source
- The pivot identifier (IP, user, or host) the chain is built around
- A confidence score explaining why the detector flagged this as a chain rather than coincidence
From the detail page you can:
- Promote to incident — click the action to create a full SOC incident from the chain
- Mark false positive — if the chain is a coincidence
- Assign — pick a team member to investigate
- Add a note — record your findings as you investigate
Step 4 — Build a chain manually
Most chains are auto-detected, but sometimes you spot a sequence yourself and want to bundle it into a chain. Click New Chain (top right of the chains list).
In the Create Attack Chain dialog:
- Enter the IP Address you suspect (e.g.
192.168.1.100). - Pick a Lookback window:
6 hours,12 hours,24 hours,48 hours, or7 days. - Click Search.
- The dialog populates with every event from that IP within the window. Each row shows severity, event type, source IP, and timestamp.
- Tick the events you want to include. Use Select all to grab everything.
- Optionally enter a Chain Title — leave blank to auto-generate.
- Click Create Chain (X events).
The new chain appears at the top of the chains list with status confirmed.
Step 5 — Bulk operations
If you have a lot of chains to triage:
- Click Select in the toolbar.
- Tick the rows you want to act on.
- Use the bottom action bar to delete multiple chains at once.
- Click Done to exit selection mode.
Reading the dual-severity scoring
A chain's severity is computed from two things:
- Maximum severity of contributing alerts — if any alert in the chain is critical, the chain is at least critical.
- Kill chain progression bonus — chains that have reached late stages (Exfiltration, Impact) get bumped up. A medium-severity reconnaissance chain that progresses to credential access becomes high. The same chain that reaches exfiltration becomes critical regardless of the original severities.
This means a chain stuck at reconnaissance is informational even if it has 200 events, while a chain with three events that reach data exfiltration is critical and demands immediate response.
Tips and best practices
- Triage critical chains first. Filter by
severity: criticalto see the chains that have reached late kill chain stages. These need response within the hour. - Don't dismiss reconnaissance chains. They're not urgent today, but tracking them helps you spot which IPs are casing your environment for a future attack.
- Use User-Based chains for insider threat detection. When the pivot is a user identity, you're tracking what that user did across the kill chain — useful for credential compromise and insider abuse.
- Promote chains to incidents when you actually start investigating. The incident workflow gives you SLA tracking, assignment, and audit history that the chain view alone doesn't.
- Manually create chains for known campaigns. When threat intel tells you a specific IP is part of an active campaign, build a chain manually with all its events so future alerts from that IP automatically attach.
Privacy
Chains, their contributing alerts, and source identifiers are scoped to your tenant. The detector only sees data your tenant has already ingested. Chains follow the same retention policy you set for SOC alerts.
Related
Try XHack AI Now
Experience the full power of XHack directly in your browser. No installation required.
Launch XHack AI