Table of contents
23
By Salman Khan, OSCP+, Founder of XHack, SRT (Synack Red Team member)
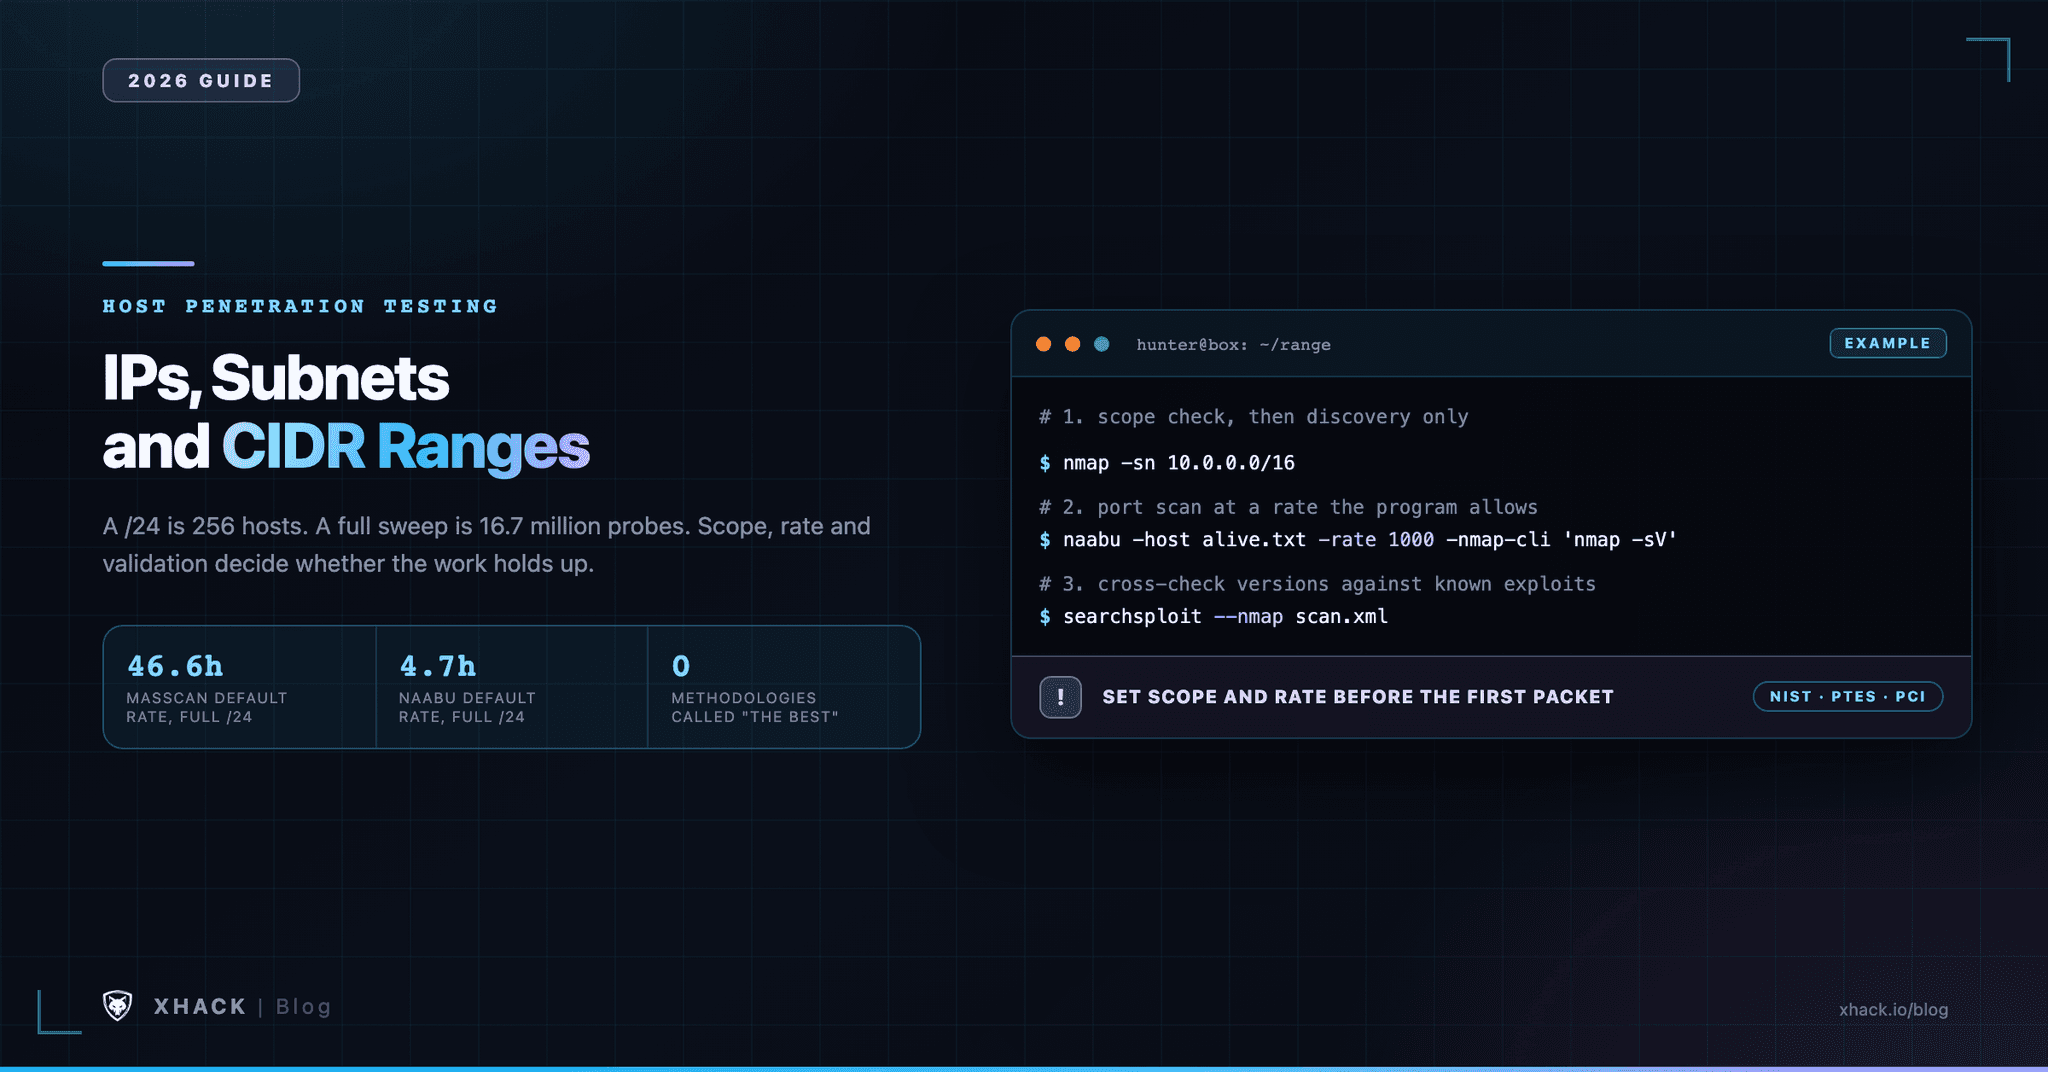
Read this in 30 seconds: This guide is for testing hosts you are authorized to test, whether that is a program scope that lists an IP range, or infrastructure you own. “Just run nmap on the range” skips the three things that decide whether the work is useful: scope, scan rate and validation.
- A /24 is 256 hosts, but a full-port sweep is 16,776,960 probes. At masscan’s documented default rate of 100 packets per second, that is 46.6 hours. At naabu’s default rate of 1,000, it is 4.7 hours.
- No methodology here is “the best,” and we are not going to pretend one is. NIST SP 800-115 (Final, September 2008) says there are “many acceptable ways of grouping the actions” in a penetration test. We built a six-step workflow from NIST’s four-stage model, PTES and what the bug bounty platforms actually require.
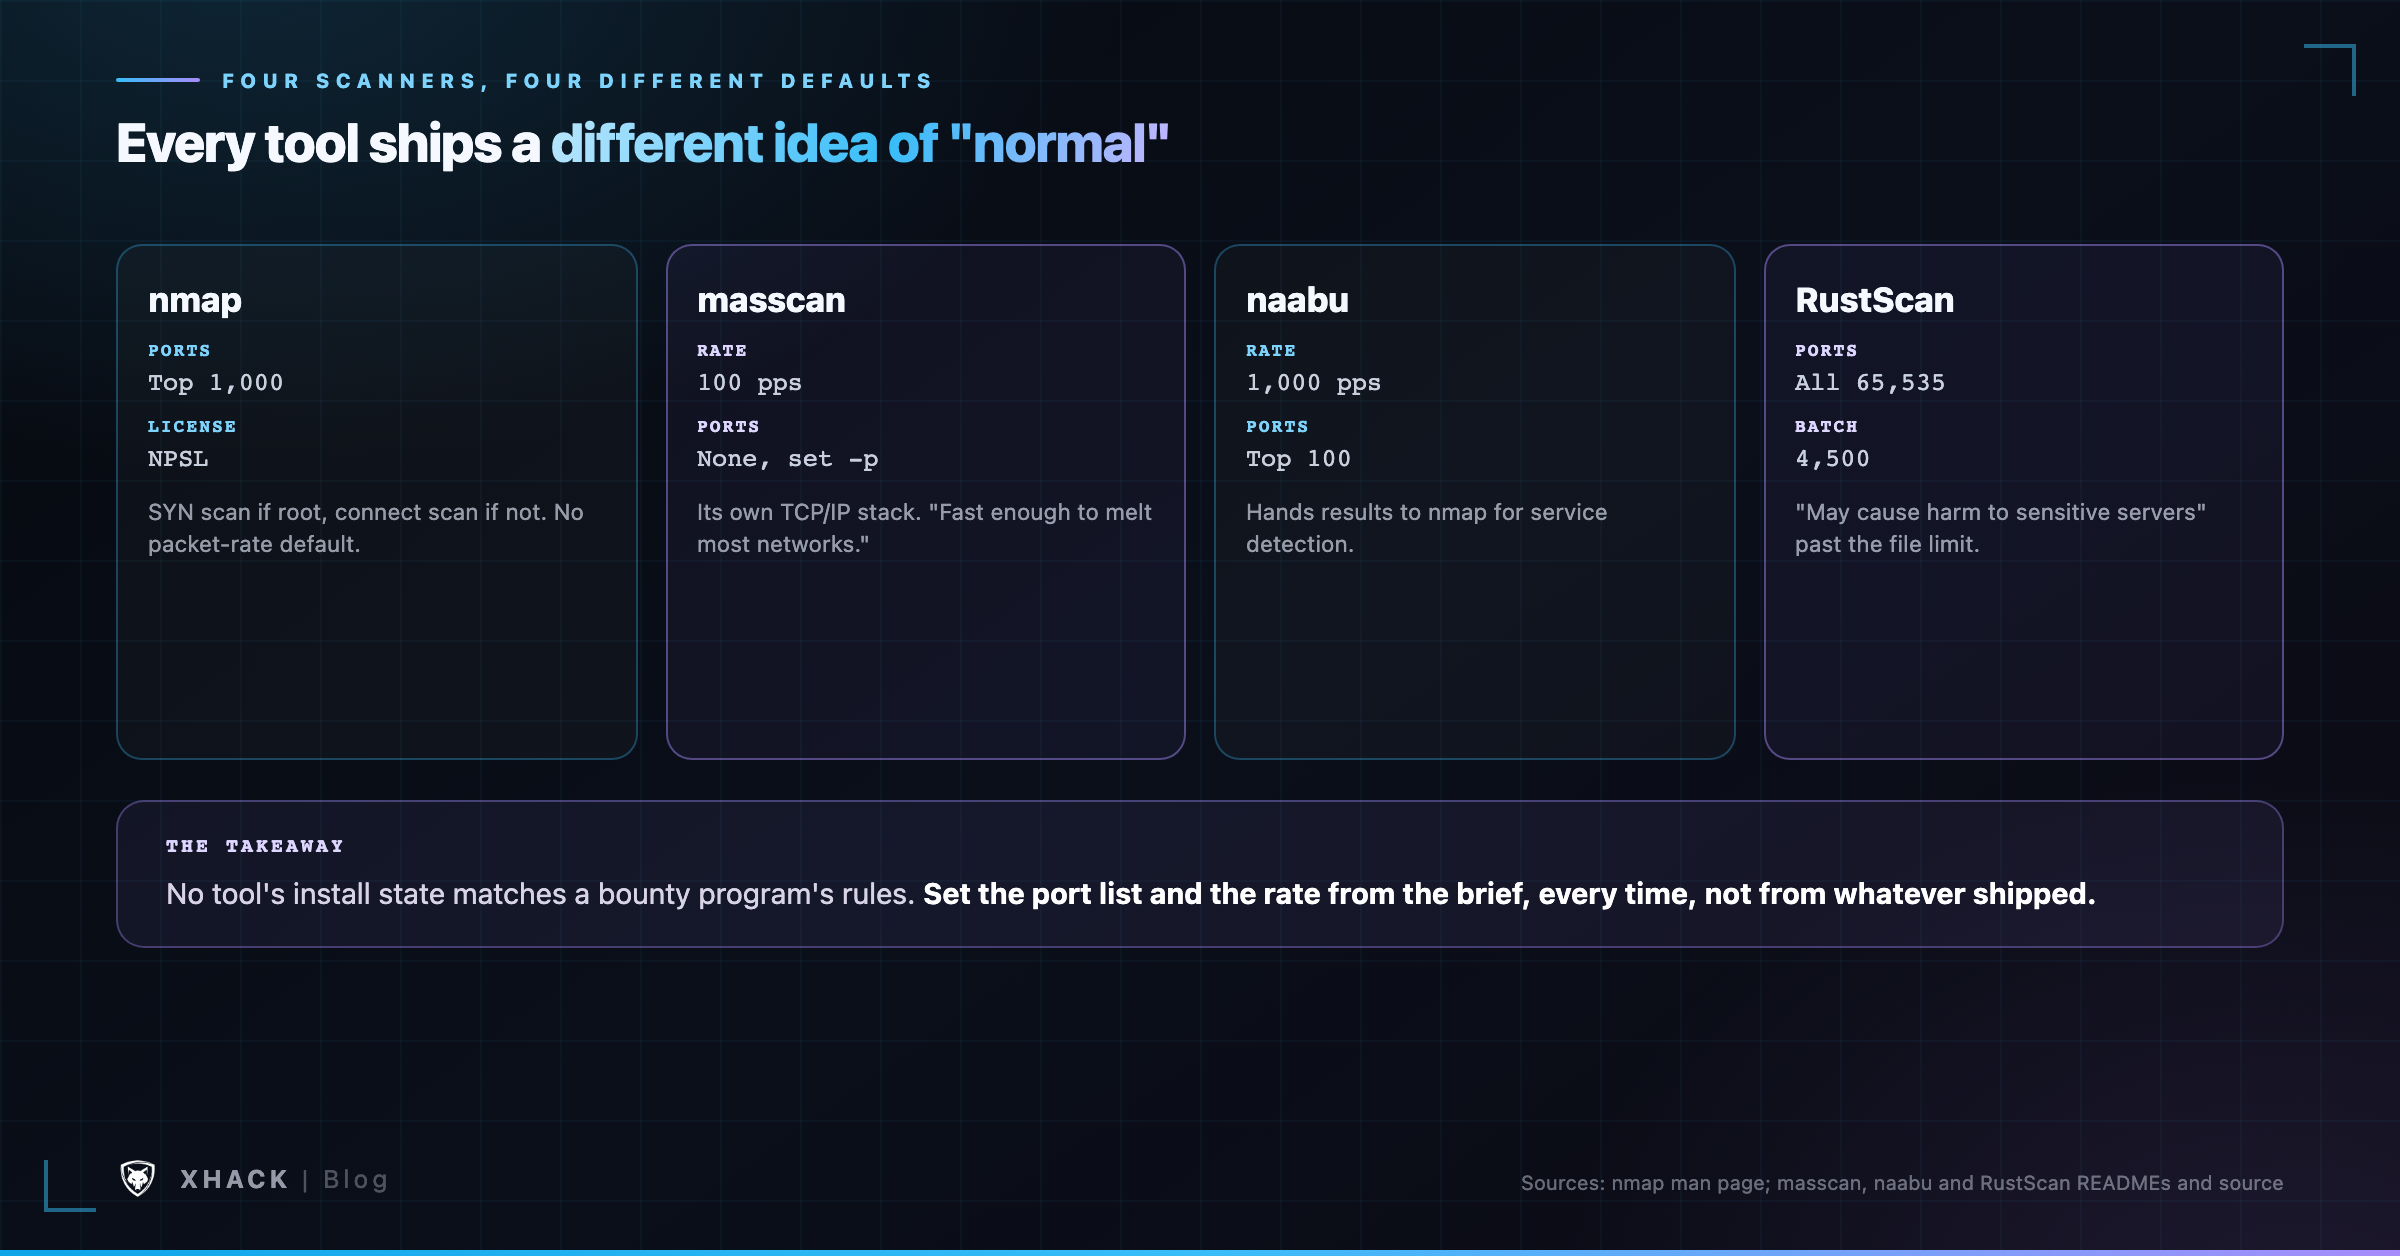
- The scanners disagree on defaults. nmap’s default is the top 1,000 ports, naabu’s is the top 100, masscan scans no ports until you set
-p, and RustScan defaults to all 65,535.- Scope is a document, not a guess. HackerOne and Intigriti both let a program define a CIDR range as an asset. Whatever the program’s scope document says about rate and authorization is the rule, not any article, including this one.
- Authorization comes first. Every command in this guide assumes a signed scope or a program you are enrolled in. Running these tools against a range you were not authorized to touch is unauthorized access, not bug hunting.
A domain is one target. An IP range is a few hundred, or a few thousand, and most of them will not answer.
That ratio is the whole problem any host penetration testing engagement has to solve. A web app engagement gives you one login page to understand. A /16 gives you 65,536 addresses, and the job starts with figuring out which ones are alive, what is listening, and which of those services are worth your time. Get the scope or the rate wrong and you either miss the finding, or you get your access pulled before you find it.
This guide covers what host penetration testing actually involves when the target is IPs, subnets or CIDR ranges rather than a single web app: the methodologies that define host penetration testing, the rules that govern scope on a bug bounty program or a cloud account, the tools at each stage with their real defaults, and where human judgment still beats automation. Every tool default, every methodology phase name and every platform rule below is quoted or sourced from the vendor’s or standard body’s own page, current as of October 2026.
Host penetration testing, network penetration testing and infrastructure penetration testing get used almost interchangeably, and the sources do not agree on a clean split. NetSPI is the one vendor we found that treats host-based testing as its own service, defined as “a deep dive review of baseline workstation and server images used to deploy systems to the corporate environment,” covering drive encryption, group policy, patch levels and service configurations on individual machines and virtual desktops.
Most other sources use “network penetration testing” as the umbrella term and split by vantage point instead: external testing, which “begins from the internet and asks whether approved public assets expose a path inward,” and internal testing, which “begins behind the perimeter from an approved connection, test workstation, or VPN.” For this guide, we use the working definition a bug hunter actually needs: host-level testing is the work you do once you have a list of live IP addresses and open ports, before you touch a specific domain’s application logic. That includes host discovery, port scanning, service enumeration and validating what each exposed service actually is.
Host penetration testing sits upstream of web application testing, not instead of it. A port scan tells you a host has 443 open. Whether that is a login page, an exposed admin panel, or a misconfigured database speaking HTTP on the wrong port is a separate question, and it is the question this guide is built around.
Every “top methodology” listicle names the same five acronyms and moves on. We read the primary documents instead, and the picture is messier and more useful than the listicles suggest.
NIST SP 800-115 is the one government-published standard for host penetration testing, and it is still current. The CSRC page lists it as “Final,” published September 2008, with no withdrawal or superseding notice.
Its penetration-testing section defines a four-stage model: Planning, Discovery, Attack and Reporting, with a loop labeled “Additional Discovery” that runs from Attack back to Discovery. The Discovery phase is explicit about host-range work: it includes “network port and service identification,” using a port scanner “to identify network ports and services operating on active hosts,” plus vulnerability analysis that compares what was found “against vulnerability databases.”
The Attack phase is “the process of verifying previously identified potential vulnerabilities by attempting to exploit them.” A footnote on the four-stage figure reads: “This is an example of how the penetration process can be divided into phases. There are many acceptable ways of grouping the actions involved in performing penetration testing.” That is NIST itself declining to crown one host penetration testing methodology the winner.
PTES, the Penetration Testing Execution Standard, names seven phases: Pre-engagement Interactions, Intelligence Gathering, Threat Modeling, Vulnerability Analysis, Exploitation, Post Exploitation and Reporting. We could not reach the official pentest-standard.org site from this environment, so we used the unofficial but widely cited readthedocs fork, which states plainly: “This version can be considered a v1.0 as the core elements of the standard are solidified,” with “A v2.0 is in the works soon.” Its technical guidelines section still references Nmap 5.51 and BackTrack Linux, both from around 2011. Treat PTES as a solid phase structure with dated technical detail, not a source for current tool flags.
OSSTMM (ISECOM) is a different kind of document: it measures “the operational security of physical locations, human interactions, and all forms of communications,” using a metric called the RAV. The current public version is 3.02, “published on Tuesday, December 14, 2010,” per ISECOM’s own PDF, which also states that “OSSTMM 4 is in active development” without confirming a public release. OSSTMM’s own rule on scope is unambiguous: “Testing must specifically target only systems which are under direct legal ownership with the scope owner.”
ISSAF, published by OISSG, is effectively dead. We could not verify its current phase structure from a source we trust; the publisher’s own site shows signs of neglect. We are not going to cite phase names we could not confirm.
PCI SSC’s penetration testing guidance (Information Supplement, Version 1.0, March 2015) matters if your host-range work supports a PCI engagement. It is explicit that scanning is not enough: “simply running an automated tool does not satisfy the penetration testing requirement. Automated tools cannot interpret vulnerabilities, misconfigurations, or even the services exposed to assess the true risk.” Its network-layer section requires testers to “verify that only authorized services are exposed at the CDE perimeter,” and its segmentation-check section explicitly says that check is “conducted using tests used in the initial stages of a network penetration test (i.e., host discovery, port scanning, etc.).”
CREST’s Defensible Penetration Test guidance (the 2023 edition) takes the opposite approach from PCI: it deliberately does not define a technical methodology. It says CREST “has instead chosen to describe the expectations around how the test is scoped, delivered and reported,” leaving “individual scoping activity to buyers and service providers to mutually agree.”
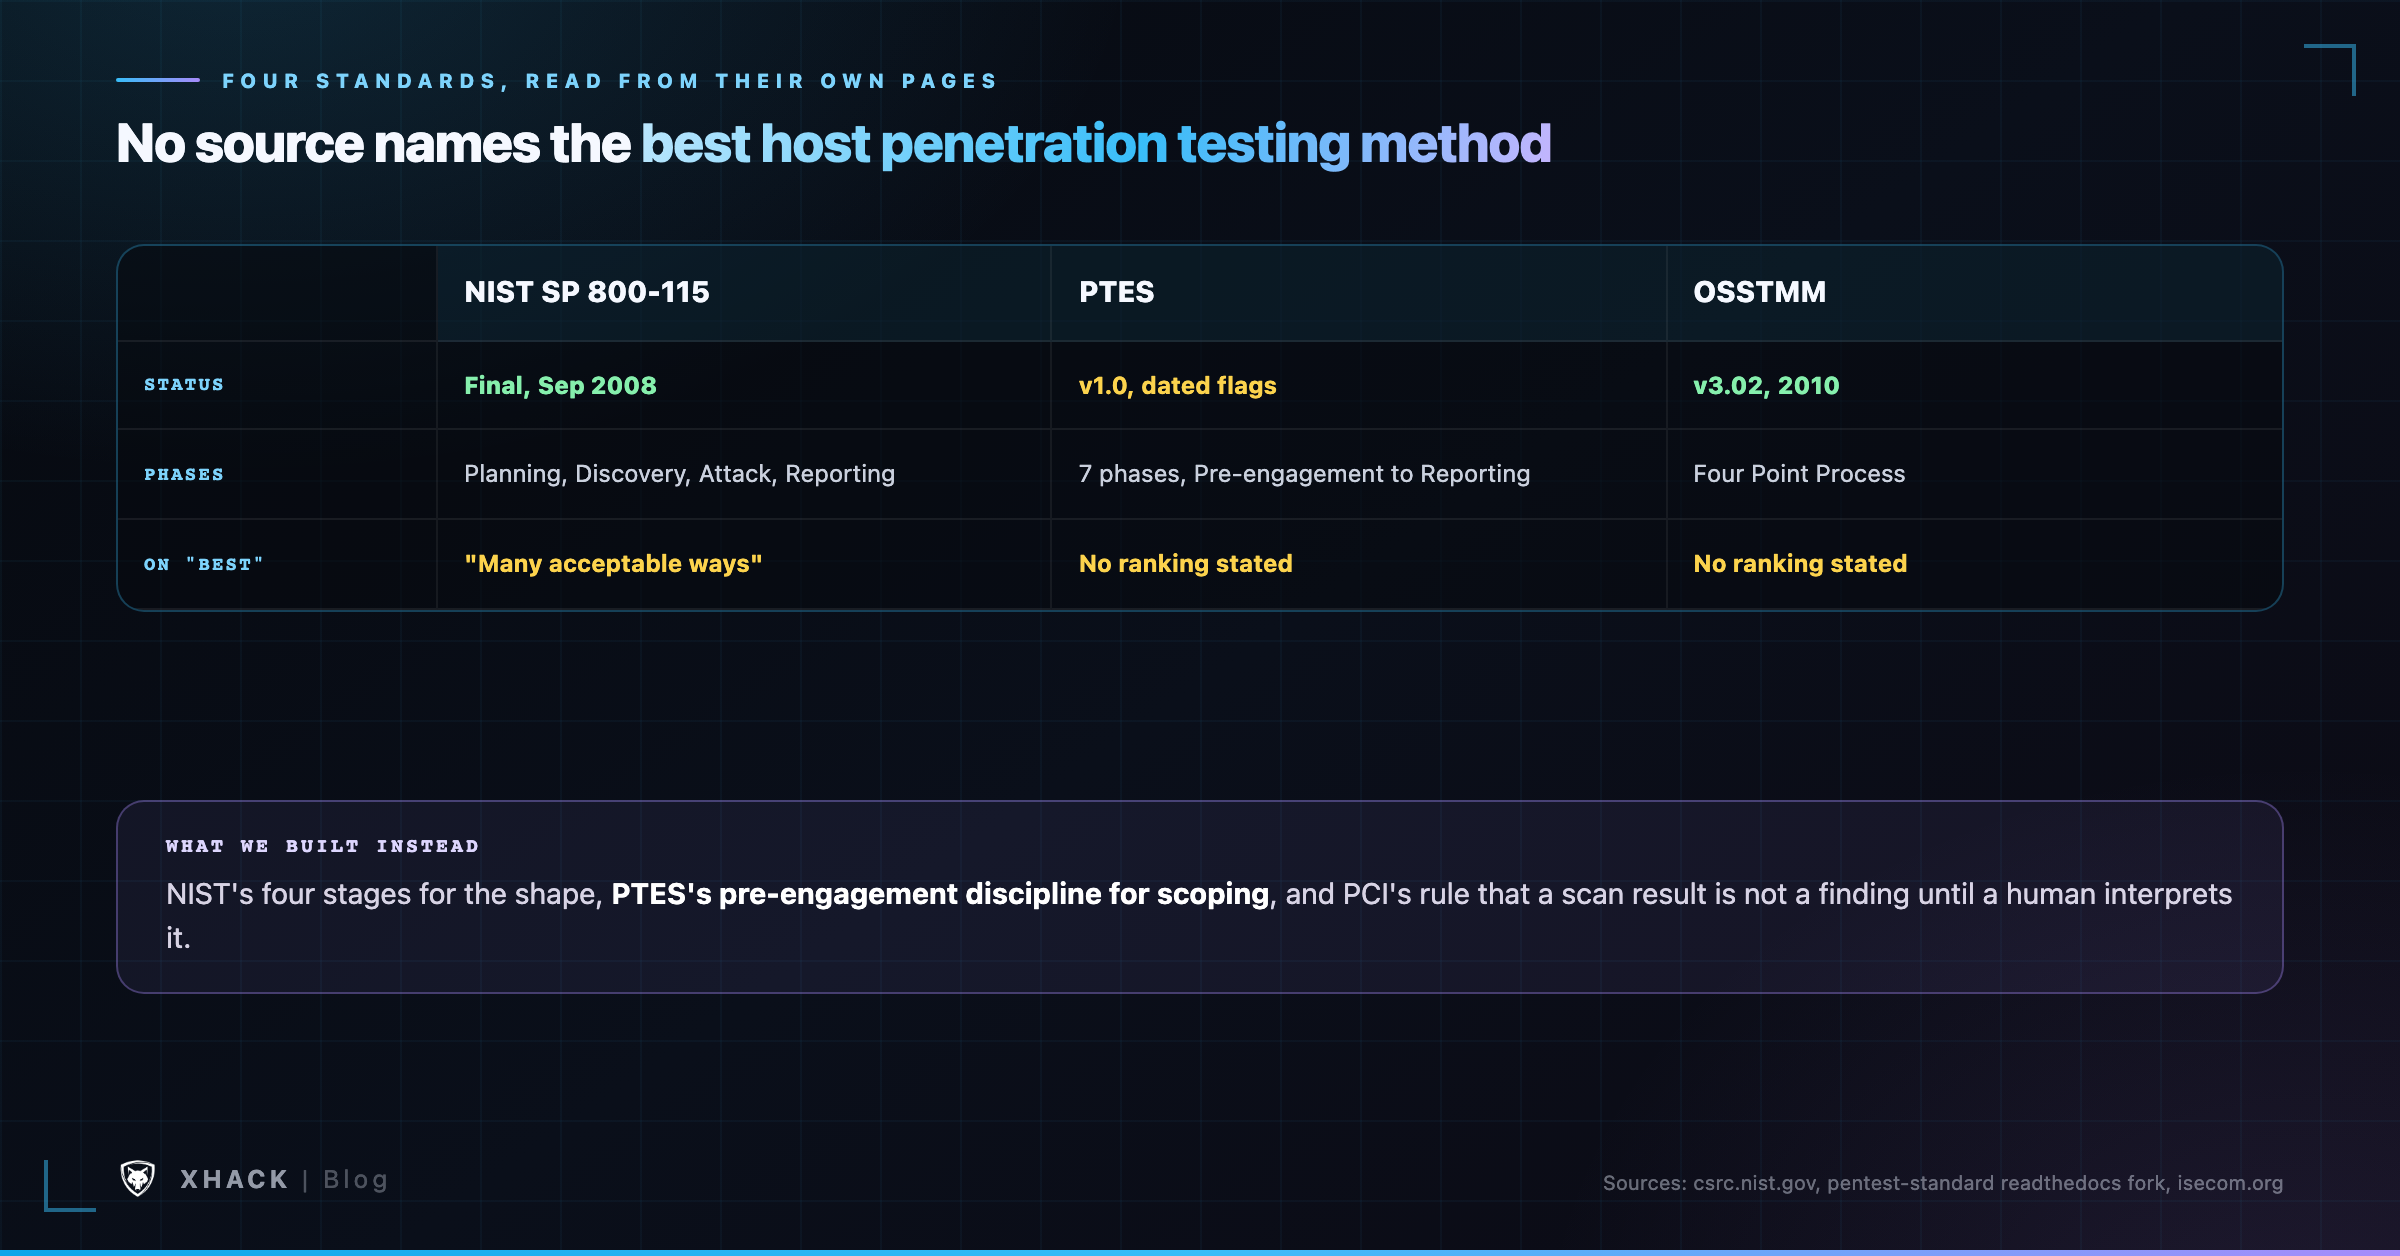
No source in this list names a winner for host penetration testing. The honest synthesis, and the one this guide follows, is NIST’s four stages as the skeleton, PTES’s pre-engagement discipline for scoping, and PCI’s insistence that a scan result is not a finding until a human interprets it.
This is the section most host penetration testing guides skip, and it is the one that keeps your account alive.
On HackerOne, a program can define scope with a CIDR asset type, described in its own docs as “Any valid IPv4 or IPv6 CIDR range,” with examples like 172.200.0.0/16. HackerOne’s guidance on defining scope says: “Your Scope is a collection of assets you want hackers to hack on,” and for anything excluded, “list it as out of scope,” which then shows hunters “a red warning when they select that asset.”
HackerOne’s Vulnerability Disclosure Standards put the real authority where it belongs: “Security Teams will publish a program policy outlining the scope of security research for their program. You should always carefully review this program policy prior to participating in a program.”
On Bugcrowd, the Standard Disclosure Terms are specific about rate: “If you notice performance degradation on the target systems, you must immediately suspend all use of automated tools.” Scope is similarly explicit: “Testing should be performed only on systems listed under the program brief ‘Targets’ section. Any other systems are Out Of Scope.” Network-level denial of service is listed as an excluded submission type.
Bugcrowd also publishes a practitioner guide specifically about CIDR scope for host penetration testing. Unless a program states otherwise, being given a CIDR range generally means “hackers are allowed to hack on whatever open port they can find on any host,” across the full 1-65535 range. The same guide pairs that with its own caution: run too fast and you “may miss many open ports,” and the fix is “lowering the rate or even using a different tool such as Nmap.”
On Intigriti, a program’s assets include an “IP Range” type, described as “A range of IP addresses, often specified using CIDR notation,” with the same kind of examples as HackerOne. Intigriti’s own guidance on scanning says plainly that rate limits are “per program, not per tool,” and that some programs cap automated tools at single-digit requests per second: “these programs permit automated tools but only if they send 2-10 requests per second (RPS), depending on the program.”
If the range belongs to a cloud account instead of a bounty program, the provider’s own policy is the scope document for your host penetration testing work. AWS’s security testing page says customers “are welcome to carry out security assessments or penetration tests of their AWS infrastructure… without prior approval for the services listed,” but draws a hard line: “Customers are not permitted to conduct any security assessments of AWS infrastructure or the AWS services themselves.” It separately prohibits “Denial of Service (DoS), Distributed Denial of Service (DDoS),” port flooding, protocol flooding and request flooding outright.
Azure’s policy, per Microsoft Learn, says “You don’t need Microsoft’s pre-approval” to test your own Azure resources, and explicitly permits port scanning “of your endpoints.” It is just as explicit on the other side, prohibiting “Denial of Service (DoS) testing of any kind” and “Network-intensive fuzzing or automated testing that generates excessive traffic.”
The pattern across every one of these sources is the same: scope is whatever the program or provider’s own document says, rate limits are set per program and not by a tool’s default, and DoS-adjacent behavior, including a scan run too hot, is treated as a violation rather than a finding. Read the policy before you open a terminal. We mean that literally, not as a disclaimer.
We assembled this host penetration testing workflow from NIST’s four stages, the bug bounty platforms’ own guidance, and nmap’s documented behavior, because no single source lays out all six steps for range-scoped bounty work.
The rest of this guide walks through the host penetration testing steps 2 to 5 tool by tool, with the real defaults and the commands the official documentation actually shows.
nmap’s own man page is specific about what happens with no flags: “By default, Nmap performs a SYN Scan, though it substitutes a connect scan if the user does not have proper privileges to send raw packets (requires root access on Unix).” On ports, the default is narrower than most people assume: “By default, Nmap scans the most common 1,000 ports for each protocol.” -p- expands that to all 65,535. For host discovery alone, -sn disables the port scan; -Pn skips discovery entirely and treats every address as online, which matters on ranges where ICMP is filtered.
# Discovery only, across a /16, no port scan
nmap -sn 10.0.0.0/16

# Top-1000-port SYN scan with version detection on a /24, output in all formats
nmap -sS -sV -oA range-scan 10.0.0.0/24masscan’s README states its default plainly: “By default, the rate is set to 100 packets/second.” Unlike nmap, it has no default port set at all, so you must pass -p. Its README is also upfront about the tradeoff of its own speed: “it can do 1.6 million packets-per-second. That’s fast enough to melt most networks.” It uses its own TCP/IP stack rather than the kernel’s, which the README flags directly: “masscan uses its own ad hoc TCP/IP stack. Anything other than simple port scans may cause conflict with the local TCP/IP stack.”
# All ports, across a /24, at a rate far below masscan's own default ceiling
masscan 10.0.0.0/24 -p1-65535 --rate 1000 -oJ masscan-results.jsonnaabu’s README gives its defaults directly: -top-ports defaults to “100” (the README adds, “By default, the Naabu checks for nmap’s Top 100 ports”), -rate defaults to “1000,” and -c (worker threads) defaults to “25.” It integrates with nmap for the enumeration step that follows: “We have integrated nmap support for service discovery… make sure you have nmap installed to use this feature.” Its own help text includes a direct warning: “Use with caution. You are responsible for your actions.”
# naabu against a CIDR, full port range, piped into nmap for service detection
naabu -host 10.0.0.0/24 -p - -rate 1000 -nmap-cli 'nmap -sV' -o naabu-results.txtRustScan’s defaults are the opposite of naabu’s: with no port flag, it scans the full 1-65,535 range by default, not a shortlist. Its documented batch size default is 4,500, and its own source carries a caution tied to that: “File limit is lower than default batch size. Consider upping with –ulimit. May cause harm to sensitive servers.” It is built to hand off to nmap for the detail work: the README says it “Automatically pipes ports into Nmap.”
ZMap is a different class of tool, built for single-port, Internet-scale surveys rather than per-host service discovery. Its own man page gives a default rate of “10000 pps,” and its README states the scope directly: “ZMap is a fast stateless single packet network scanner designed for Internet-wide network surveys.” For a bounty-scoped range, this is the wrong tool; it earns its place on infrastructure you control and are measuring at scale, not on a program’s CIDR.
A /24 is 256 hosts. A full-port sweep of a /24 is 256 x 65,535, or 16,776,960 probes. At masscan’s own documented default of 100 packets per second, that is 167,770 seconds, or 46.6 hours. At naabu’s default of 1,000, the same sweep is 4.7 hours. Restrict to nmap’s default top-1,000 ports instead of all 65,535 and the same /24 drops to 256,000 probes, under 43 minutes even at 100 pps.
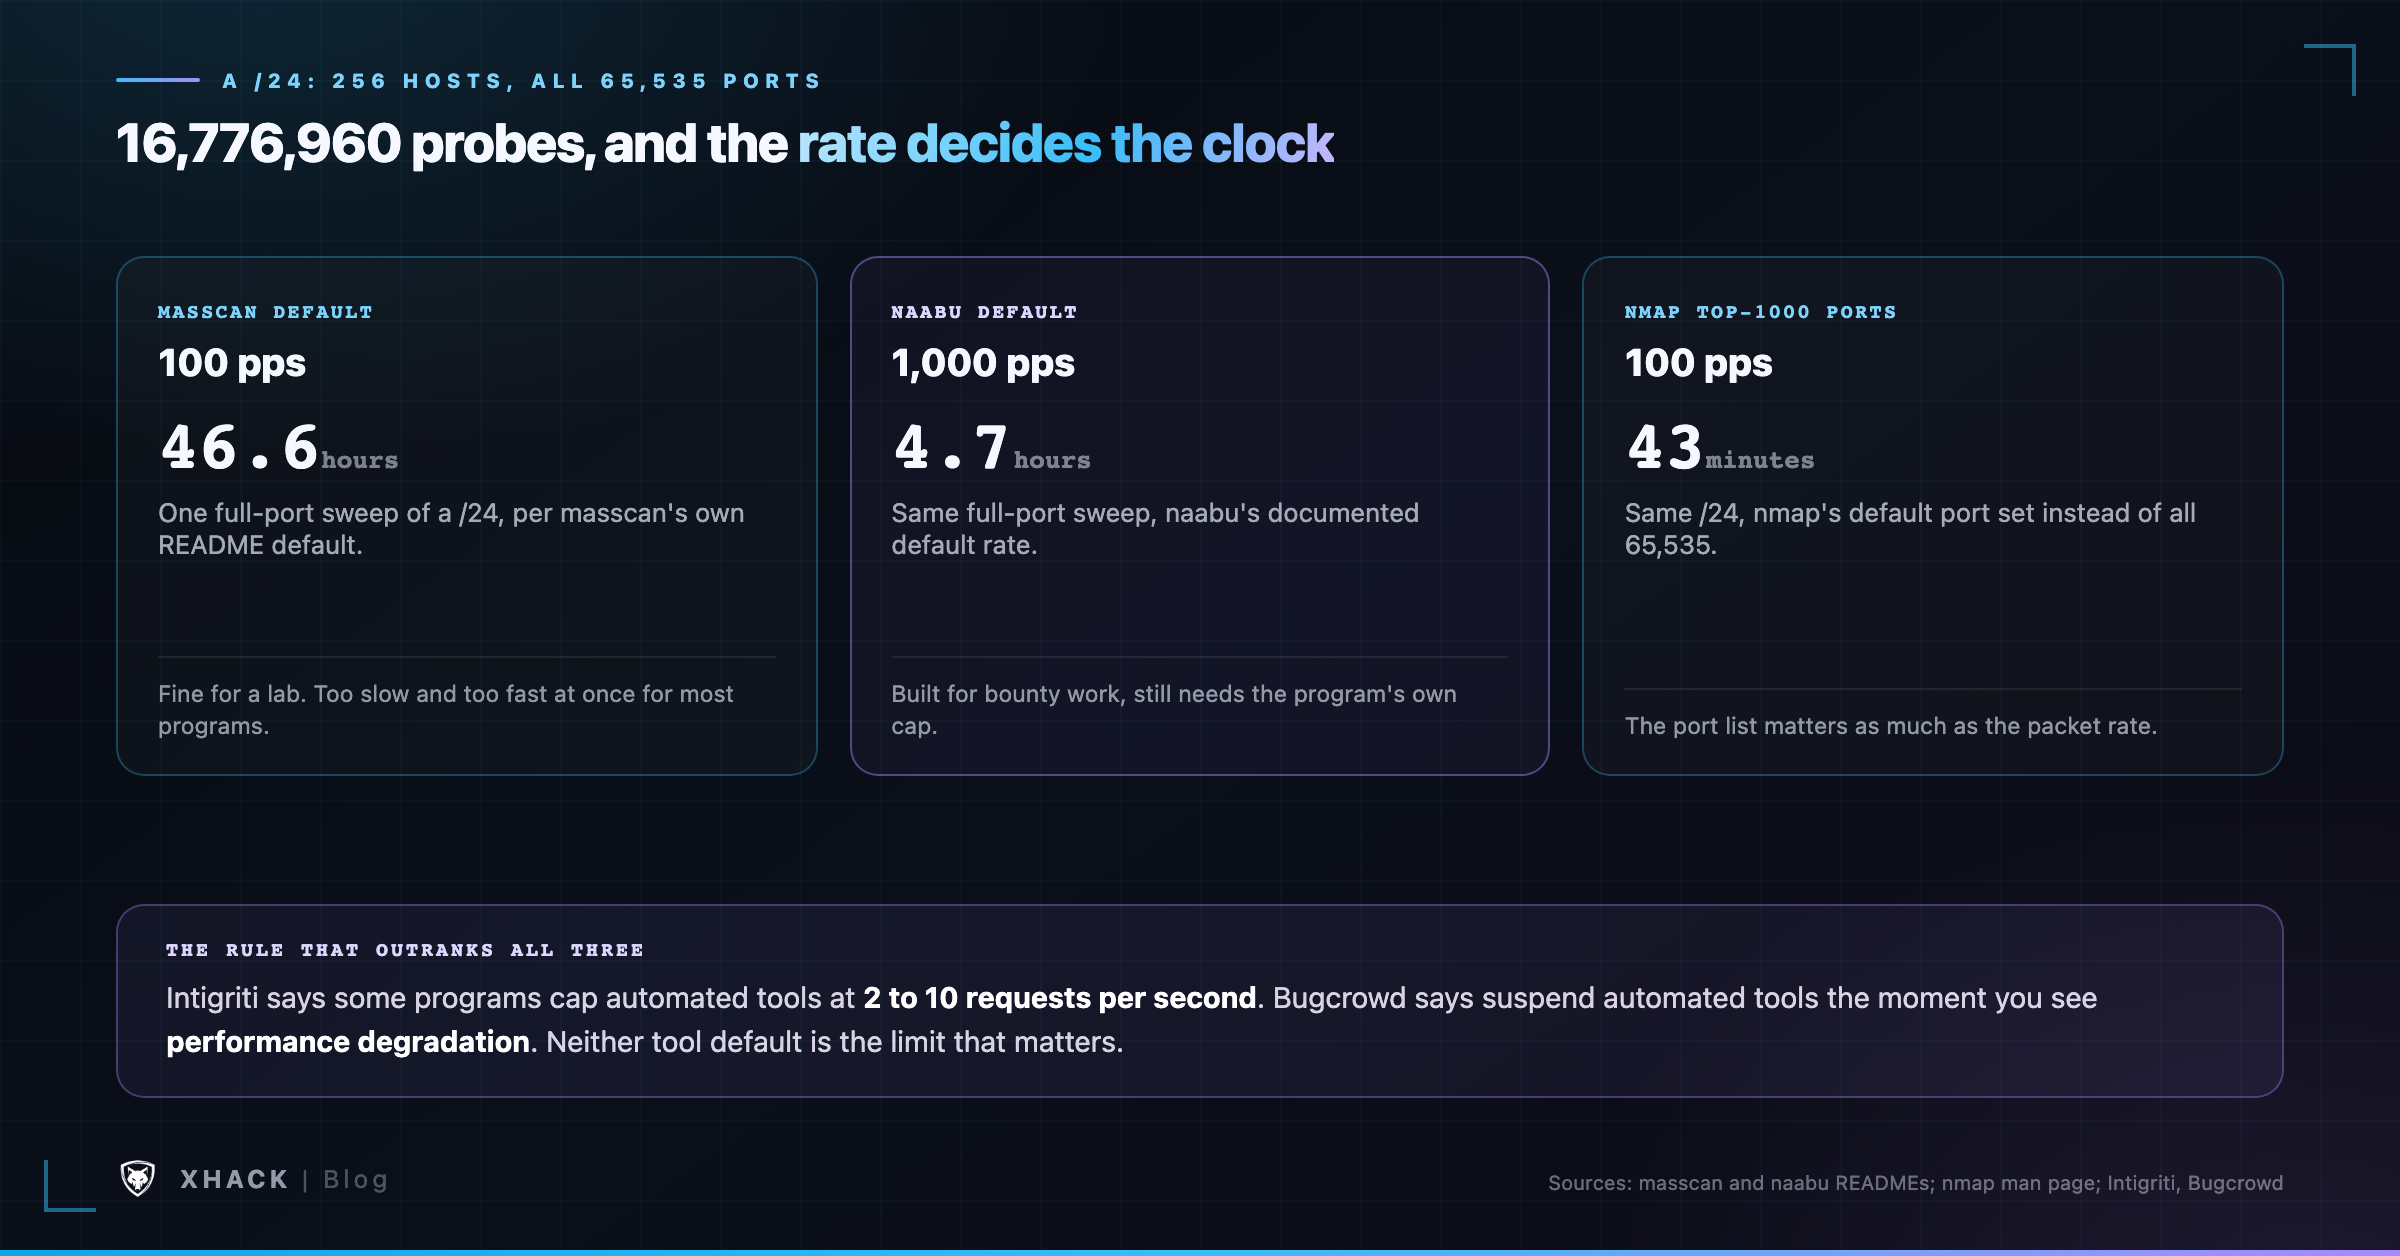
That is the actual argument for scoping your host penetration testing port list before your rate: the port count multiplies the host count, and the host count is often much larger than a single /24. A program’s stated rate limit, whatever it is, is the number to plan around, not any tool’s shipped default.
Once host penetration testing has given you live hosts and open ports, the next job is identifying what is actually running, and then checking, within your authorization, whether it is exploitable. This is where scanner output turns into a report or gets discarded as noise.
NetExec (nxc), the actively maintained successor to CrackMapExec, describes itself as “a network service exploitation tool that helps automate assessing the security of large networks.” It runs per protocol (smb, ssh, ldap, winrm, mssql, rdp, nfs and others) and accepts CIDR notation directly: nxc smb 10.0.0.0/24. Its documentation describes checking for SMB null sessions, which require no valid credentials, as a standard enumeration step for assessing exposure, run with empty credential values rather than any password guessing.
nuclei, from ProjectDiscovery, has network and TCP protocol templates in addition to its better-known HTTP ones, restricted with -pt tcp or -pt dns. Its README states the default rate directly: -rl defaults to 150 requests per second, and -c (parallel templates) defaults to 25. On a program with a tight rate limit, both need to come down well below those defaults, and nuclei’s own docs flag the operational risk of running it unattended: “Running nuclei as a service may pose security risks.”
testssl.sh checks a host’s TLS and SSL configuration on any port, not just 443: testssl.sh --starttls smtp mail.example.com:587 is one of its own documented invocations for a non-web protocol. Its project page carries a plain warranty disclaimer: “Usage of the program is without any warranty. Use it at your own risk.”
snmpwalk (Net-SNMP) and onesixtyone both target SNMP, a protocol that is still commonly left exposed with default community strings on network infrastructure. onesixtyone’s own README describes what it does: it “sends SNMP requests to multiple IP addresses, trying different community strings and waiting for a reply.” Finding a device answering to the community string public is itself the finding; it means read access to device configuration is open to anyone who asks.
enum4linux-ng wraps several Samba and Windows enumeration tools into one pass against SMB hosts, and its own README demonstrates running it with “no credentials provided” to see what a host reveals to an anonymous connection: shares, OS version, and in some configurations, usernames.
Credential-testing tools like Hydra exist and are part of a real engagement’s toolkit, but we are not going to publish a ready-to-run command against a range here. Hydra’s own README states its intended use directly: “THIS TOOL IS FOR LEGAL PURPOSES ONLY!” Any credential test against a host you do not own needs the program’s explicit authorization for that specific technique, since many programs restrict or exclude brute-force and credential-stuffing activity even when the underlying host is in scope. Check the policy before you reach for this category of tool, not after.
searchsploit, the offline Exploit-DB search tool, has one feature built specifically for range-scale work: --nmap file.xml checks every service version in an nmap XML output file against its exploit database in one pass, which turns a long port scan into a short list of services worth a closer look.
Shodan and Censys are passive options for the reconnaissance step before you touch the range directly. Both read from data they already collected, rather than scanning your target live, and both gate volume behind paid tiers; check each service’s current account limits before you plan a workflow around either.
Bugcrowd’s public Vulnerability Rating Taxonomy gives a real answer for host penetration testing payouts, with specific examples. Default credentials on a service is rated P1 (“Using Default Credentials”). An exposed admin portal is also P1 (“Exposed Portal > Admin Portal”); a non-admin exposed portal drops to P3. An outdated, vulnerable software version is rated P5 on its own, which reflects version exposure being a starting point rather than a confirmed exploit. The taxonomy is explicit that these are a baseline, not a guarantee: priority “varies based on context,” and a program’s own brief can override it.
GitHub’s bug bounty rules give the cleanest statement we found on acceptable host penetration testing scan intensity: “We do allow the use of automated tools so long as they do not produce excessive amounts of traffic. For example, running one nmap scan against one host is allowed,” while distributed denial-of-service or other volumetric activity is listed as never allowed and ineligible for reward under any circumstances.
These host penetration testing mistakes show up on almost every range.
Running a tool’s shipped default against a whole range. nmap’s 1,000-port default, naabu’s 100-port default and masscan’s unlimited rate were all set for a reasonable single host or a lab, not a program’s stated limit. Set the rate and port list from the program’s rules, not the tool’s install state.
Treating a port scan as a finding. An open port is a question, not an answer. PCI’s own guidance makes this explicit: automated results alone “cannot interpret vulnerabilities, misconfigurations, or even the services exposed to assess the true risk.” Service enumeration and manual validation are what turn a line of scanner output into a report.
Skipping the scope document because the brief “seems obvious.” CIDR scope rules differ by program, by HackerOne’s and Bugcrowd’s own text above, and a range that looks wide open can still exclude specific subnets or specific ports. Read the brief first, every time.
Forgetting that host penetration testing rate limits stack across tools. If a program allows 10 requests per second and you are running host discovery, a port scanner and a template scanner at once, the program sees the sum, not each tool’s individual rate.
So yes, this is the section where we talk about XHack’s own role in host penetration testing, and we are not going to pretend otherwise. XHack is not a bug bounty platform and it does not replace your judgment on scope or authorization. What it changes is how much of the range work above you have to run by hand.
XHack AI can launch multiple sub-agents in parallel for host penetration testing work, one on recon, one on scanning, one on exploitation testing, each in “its own separate workspace,” per our own sub-agents feature page. A range that would take you an afternoon of sequential scans can run as several jobs at once.
Long jobs run in a live, streaming terminal, described on our own feature page as output that “streams output line by line, in real time, exactly as the tool produces it,” so you watch the actual scan output rather than waiting on a summary. You are not locked out of the controls while that runs. Our permission modes let you require approval for every action, auto-approve routine steps, or stay fully read-only while the agent plans, and each sub-agent can be paused, stopped, or redirected mid-task with a plain-language instruction.
Here is the part of host penetration testing we are not going to oversell. The platform’s own pages do not describe an automatic scope-enforcement control, a target allowlist, or a rate-limit cap baked into the product. The scope document and the rate limit are still yours to set and respect, the same way they would be with nmap or naabu run by hand.
Findings the agent produces carry proof, reproduction steps and a recommended fix, per our findings feature. But our terms of service state plainly that AI output “may be incomplete, inaccurate, outdated, or wrong,” and may report false positives or miss real vulnerabilities. Review every finding before you submit it, exactly as you would review scanner output from any other tool.
If you want to see what AI-assisted host penetration testing looks like on a range you are authorized to test, the individual plans start at $20 a month with a 7-day free trial.
Host penetration testing is the work of testing individual IP addresses, subnets or CIDR ranges rather than a single web application: finding which hosts are alive, which ports are open on each, what service is actually running behind each port, and validating whether any of that is exploitable within your authorization.
Most sources treat host penetration testing and network penetration testing as the same work described two ways. NetSPI is the exception, defining host-based testing narrowly as a review of workstation and server images. For range-scoped bug bounty work, the practical line is host testing being everything up to and including service identification on an IP, and network testing being the broader exercise across many hosts plus lateral movement and segmentation checks.
A host penetration testing toolkit needs, at minimum: a host-discovery and port scanner (nmap for accuracy, naabu or masscan for speed), a service-enumeration layer matched to what you find (NetExec for Windows and SMB-heavy ranges, nuclei for template-based checks, testssl.sh for TLS), and a way to cross-reference versions against known exploits, such as searchsploit’s nmap-XML mode.
Whatever the program states, and nothing faster. Intigriti’s own guidance says some programs cap automated tools at 2 to 10 requests per second, and Bugcrowd’s terms require you to suspend automated tools immediately if you see performance degradation on the target. There is no universal safe rate.
Not automatically. Bugcrowd’s own CIDR guide says that, absent other instructions, a listed range generally means any open port on any host is fair game, but that default can be narrowed by the program’s own brief, and out-of-scope exclusions inside a broader range are common. Read the brief, not just the asset list.
None of the standards bodies crown a single best host penetration testing methodology, including NIST itself. Use NIST SP 800-115’s four-stage structure for the shape of the engagement, PTES’s pre-engagement checklist for scoping conversations, and whichever program’s own rules govern the specific range you are testing.
Host penetration testing on an IP range is never “run nmap and see what happens.” Real host penetration testing is reading the scope document first, choosing a scan rate the program actually allows, running discovery and port scanning with tools whose real defaults you understand, enumerating services instead of trusting a port number, and validating before you report. Every host penetration testing methodology in this space agrees on that shape, even when they disagree on the label.
Categories
Related articles